Ever found yourself staring at the clock, wondering why the minutes slip away during study sessions?
You’re not alone. The feeling of time slipping through your fingers is something every student, freelancer, or busy professional knows too well.
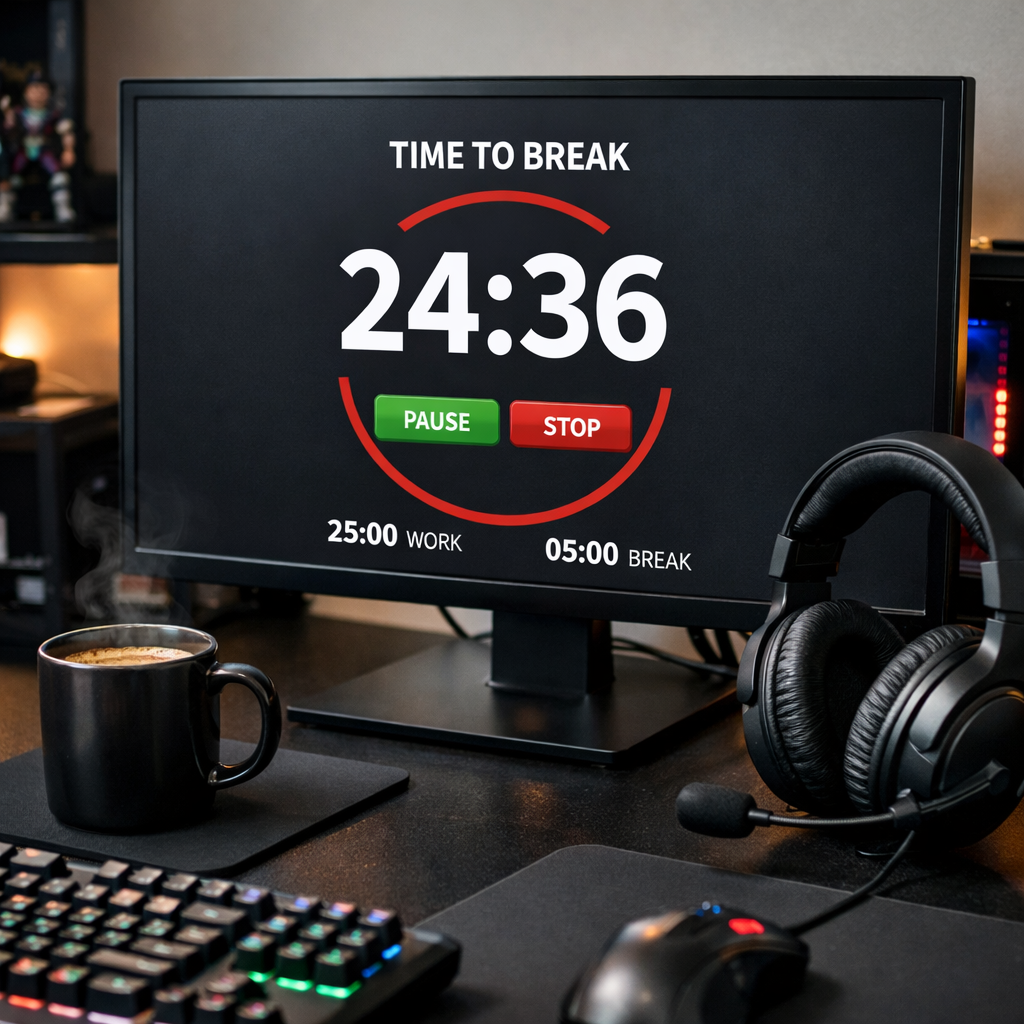
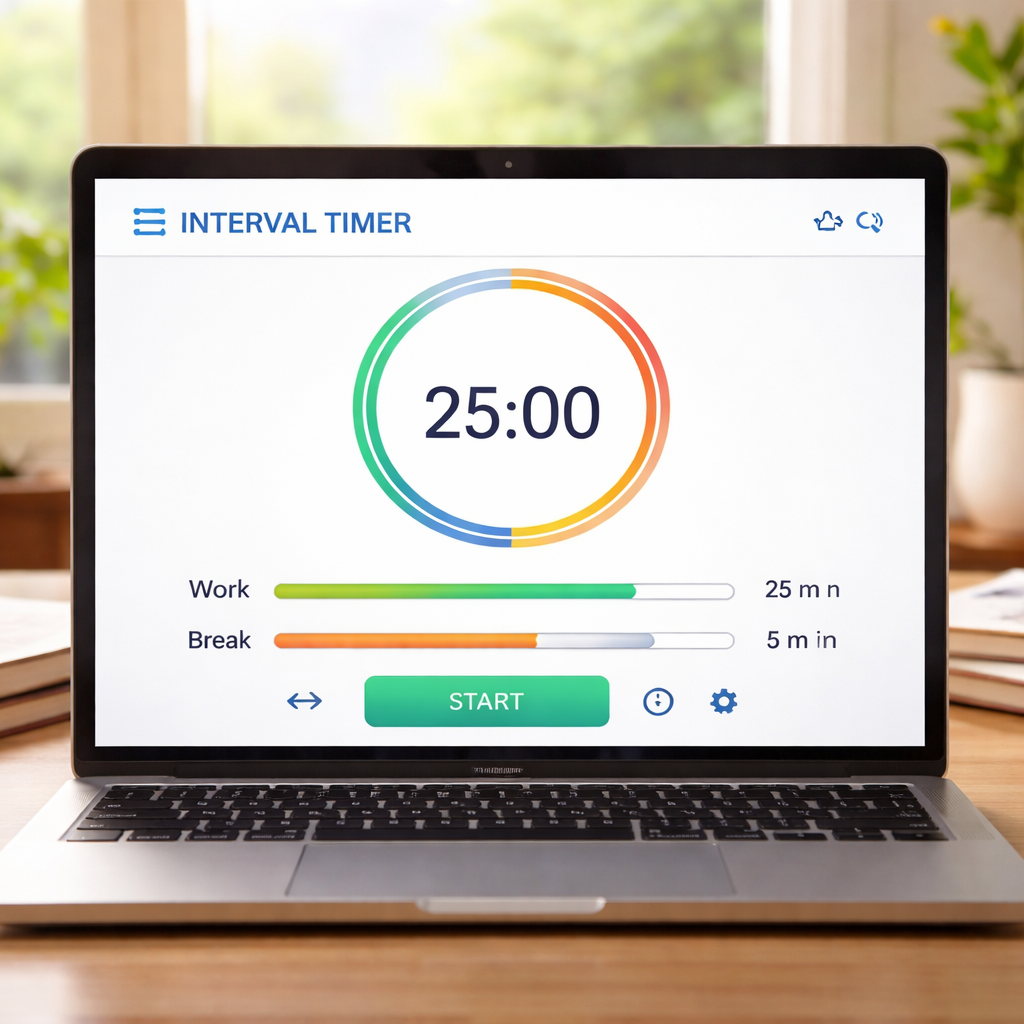
That’s where an interval timer online can become a game‑changer. Instead of guessing when to switch tasks, you get a clear, audible cue that says, “Okay, time to focus” and later, “Time for a break.”
Think about the last time you tried the Pomodoro Technique with a kitchen timer that beeped unpredictably. Frustrating, right? An online timer removes that guesswork, letting you dive straight into work.
In our experience at Focus Keeper, users who swap a manual stopwatch for a reliable interval timer online report sharper focus and fewer distractions.
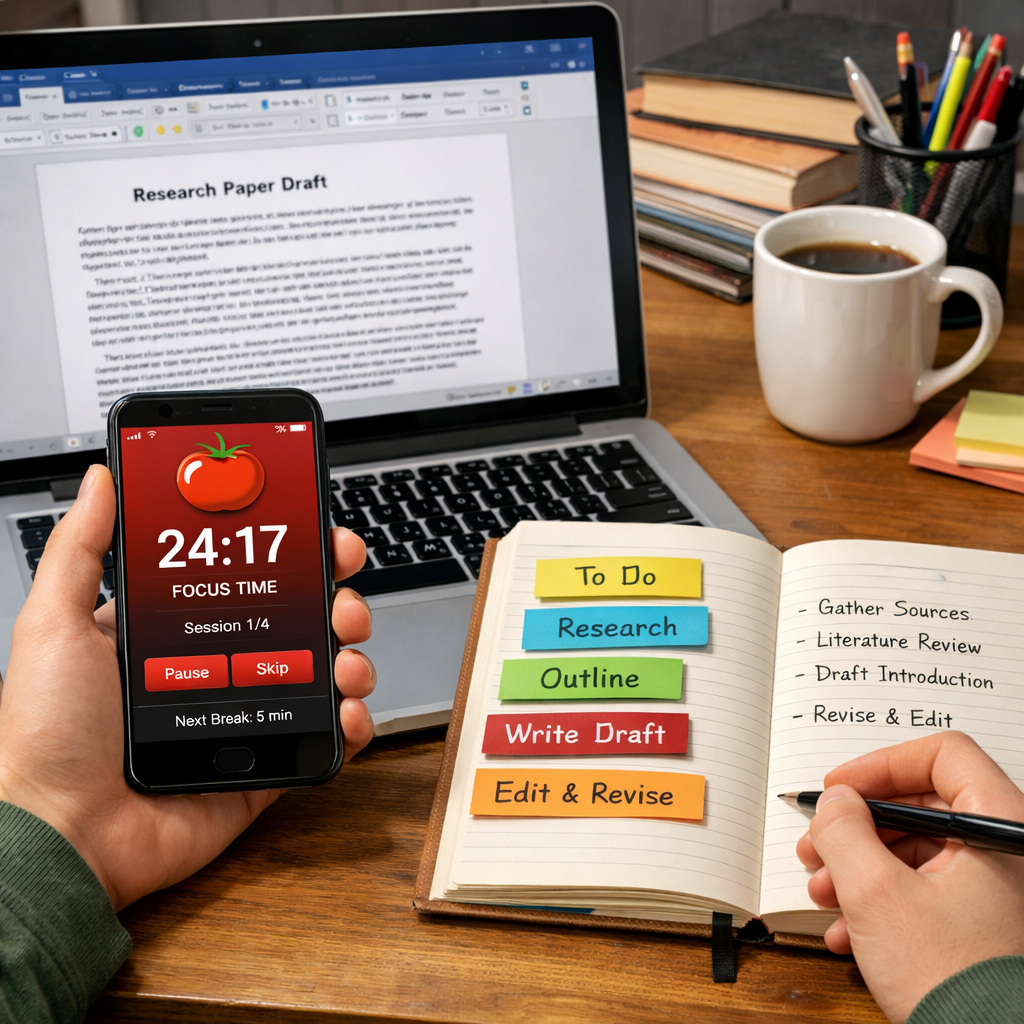
Picture this: you’re a student prepping for finals, you set a 25‑minute work sprint, the timer counts down, you stay in the zone, when the bell rings you reward yourself with a short walk. The cycle repeats, and before you know it, a mountain of material feels manageable.
Remote workers love the same rhythm. A clear start‑stop signal helps signal to teammates when you’re deep in a task and when you’re available for a quick chat.
Freelancers juggling multiple projects can assign different intervals to each client, keeping billing transparent and energy balanced.
Busy professionals often think they don’t have time to set up tools, but an interval timer online works right in your browser—no download, no installation, just a simple start button.
And because it’s online, you can sync the same timer across devices, whether you’re on a laptop at a café or a tablet at the office.
So, what does this mean for your daily flow? It means you can replace vague “work for a while” plans with concrete, timed blocks that train your brain to focus on demand.
Ready to give your schedule the structure it craves? Let’s explore how to pick the right interval timer online and get the most out of every minute.
TL;DR
An interval timer online turns vague work blocks into concrete, timed sprints, helping students, remote workers, freelancers, and busy professionals stay focused and track breaks without installing software.
Start a 25‑minute sprint, let the audible cue signal focus, then reward yourself with a short walk—repeat, and you’ll see productivity climb steadily.
Step 1: Choose the Right Interval Timer Features
Ever caught yourself mid‑task wondering if you set the timer long enough or too short? That moment of uncertainty is exactly why the right features matter. Let’s walk through what to look for so your interval timer online actually works for you.
In our experience students love a timer that lets them pick any work‑burst length—from a quick 10‑minute sprint before a lecture to a deep‑focus 90‑minute block for essay drafting. Remote workers, on the other hand, often need a clear split between focused work and scheduled check‑ins with teammates.
Customizable interval lengths
First up, make sure the timer lets you define both work and break periods independently. A rigid 25/5 Pomodoro setup can feel restrictive when you’re juggling a 45‑minute client call followed by a 20‑minute email sprint. Look for a slider or input fields that let you fine‑tune each segment without hunting through menus.
Tip: start with the classic 25‑minute work slot, then experiment. If you’re a freelancer switching between design mock‑ups and coding, you might find a 40‑minute focus window followed by a 10‑minute stretch break hits the sweet spot.
Audible alerts that cut through the noise
Next, think about sound. A timer that only beeps softly may get lost in a bustling cowork‑space, while a harsh alarm could jolt you out of flow. Choose a tool that offers a library of tones—soft chimes, nature sounds, even a short voice cue that says “focus” or “break.”
If you work late, consider a vibration option for mobile devices so the cue doesn’t disturb anyone else. Some browsers even let you set a custom notification that pops up on your screen, giving a visual reminder in addition to the sound.
Visual cues and progress tracking
Seeing the countdown shrink can be surprisingly motivating. Look for a timer that displays a circular progress bar or a simple numeric read‑out that updates in real time. Some tools also let you add a visual agenda—like a colour‑coded bar that marks study, meetings, and breaks.
For a practical example of how a visual agenda can keep your day on track, check out this visual agenda guide—it walks you through setting up colour‑coded blocks that sync nicely with any interval timer online.
Cross‑device sync
Whether you hop from a laptop at a café to a phone on the bus, your timer should follow you without missing a beat. Look for cloud‑based saving so the same intervals, sounds, and progress bar appear on every device you log into.
After each focus sprint, you might want a quick recap of what you accomplished. A handy trick is to record a short voice note and run it through a summarizer tool—like the one at YT Summarizer—to get bullet points without breaking your flow.
Reporting and analytics
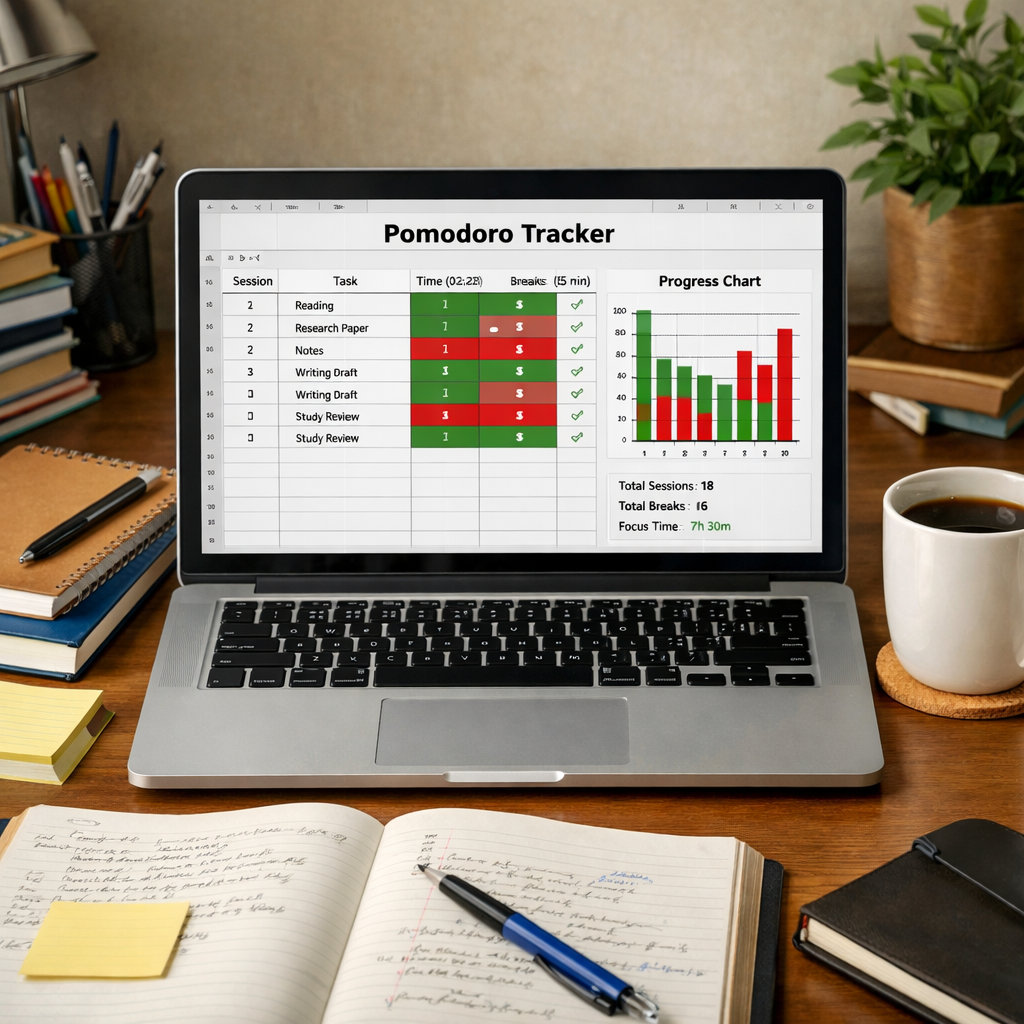
Some timers go beyond the clock and give you stats: total focus minutes, average break length, even a heat map of your most productive hours. These insights let you negotiate your schedule with yourself—adjusting intervals when you notice a slump, using proven negotiation strategies from Edge Negotiation.
Want to see these features in action? Watch the quick walkthrough below.
Notice how the timer lets you toggle sound, adjust intervals on the fly, and sync across devices—all with just a few clicks.
With the right settings, you’ll start to feel the rhythm of focused work and restorative breaks, turning scattered tasks into a smooth workflow.
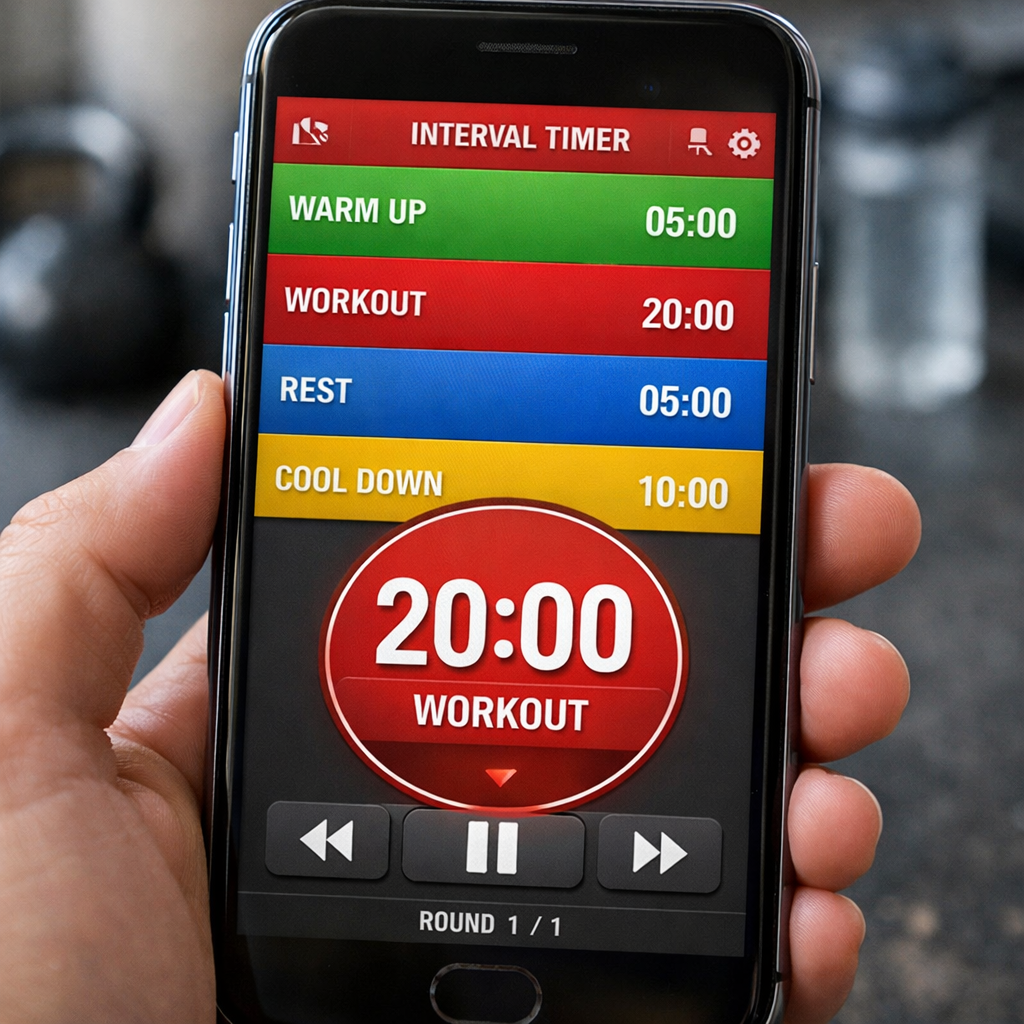
Step 2: Set Up Your Workout Intervals
Alright, you’ve picked a timer that feels right. Now it’s time to actually tell it what to do. Think of it like setting up a playlist – you decide the order, the length of each track, and when the next song should start.
1. Define the purpose of each block
First, ask yourself: what am I trying to achieve in this session? A student might want a 25‑minute study sprint followed by a 5‑minute stretch. A remote worker could alternate 45‑minute coding bursts with 10‑minute micro‑breaks for eye‑rest. A freelancer juggling clients may label intervals “proposal draft” and “email catch‑up.” Write those intentions down – you’ll use them as the names for each interval.
2. Choose lengths that match your rhythm
Here’s a quick cheat‑sheet you can copy‑paste into a sticky note:
- Focus burst: 20‑30 min (most people stay sharp for about half an hour).
- Active break: 3‑5 min – stand, stretch, sip water.
- Long break or transition: 10‑15 min – a quick walk or a coffee.
Adjust those numbers until they feel natural. If you’re doing a HIIT workout, you might go with 30 sec high intensity, 10 sec low intensity, repeated 12 times – that’s the classic 7‑minute circuit you see on many fitness blogs.
3. Name and order the intervals
Most online HIIT timer builders let you drag‑and‑drop blocks and rename them. Give each slice a clear label: “Study‑Focus”, “Stretch‑Break”, “Project‑Call”. When the timer flashes “Stretch‑Break”, you don’t have to guess – you know exactly what to do.
And if you’re juggling multiple projects, create a round‑based structure: set “Client‑A” for 40 min, “Client‑B” for 30 min, then a 10‑minute buffer. The timer will loop through the round, keeping your day balanced without you having to reset it every hour.
4. Add warm‑up and cool‑down periods (optional)
For workout‑oriented sessions, a brief warm‑up primes your muscles and a cool‑down helps you transition back to work. On the same step‑by‑step setup guide, the author shows how to stick a 30‑second warm‑up before the first high‑intensity interval and a 30‑second cool‑down at the end. You can copy that pattern for any activity – even a mental warm‑up like a two‑minute breathing exercise.
5. Set the number of rounds
Decide how many cycles you need. If you’re doing a Pomodoro‑style study session, three rounds of 25‑minute focus + 5‑minute break might be enough for a half‑day. For a full‑body HIIT circuit, 12 rounds (as in the 7‑minute workout) give you roughly eight minutes of sweat – enough to boost metabolism without overdoing it.
Most timers let you save a preset, so you’ll never have to type those numbers again. In practice, I create a “Morning‑Power‑Round” preset that I fire up with one click before my first cup of coffee.
6. Test and tweak
Hit start and watch the countdown. Does the beep arrive a second before the interval ends? Is the full‑screen view hiding distracting tabs? If something feels off, pause, adjust the seconds, and try again. The goal is a smooth flow where the timer disappears into the background and the cue becomes your subconscious nudge.
Take a minute after the first run to note any friction: “The break beep is too soft in the café” or “I need a longer cool‑down after the last set.” Tweak those settings, then run a second test. Within two iterations you’ll have a custom rhythm that matches exactly how you work or train.
7. Make it a habit
Now that your intervals are dialed in, embed the timer into your daily ritual. For students, launch the timer right after you close your textbook. Remote workers can start the timer at the top of a Zoom call, signalling teammates when you’re deep‑in‑focus. Freelancers might pair the timer with their invoicing software – each finished round equals a billable block.
And remember, the timer is a tool, not a dictator. If a particular interval feels too long or short, change it. The beauty of an interval timer online is that you can iterate instantly without reinstalling anything.
So, what’s your next move? Grab your favourite online timer, follow the steps above, and watch how a few seconds of planning turn chaotic work into a rhythm you actually enjoy.
Step 3: Customize Alerts and Notifications (Video Walkthrough)
Why alerts matter
Imagine you’re deep in a study sprint and the timer’s beep is so faint you barely notice it over the café chatter. You lose those precious minutes and have to scramble to get back on track. That tiny sound cue is the bridge between “in the zone” and “back to reality”. Customising alerts lets you fine‑tune that bridge for whatever environment you work in.
For remote workers, a clear notification signals teammates that you’re stepping out of focus mode, cutting down those awkward “Are you free?” Slack pings. Freelancers can use different sounds to mark billable blocks versus admin time, keeping the invoice sheet honest without staring at a clock.
Step‑by‑step: Tuning your sound profile
1. Choose the right alert type. Most interval timer online tools let you pick a beep, a bell, a voice prompt, or even silence. Pick a beep for a classic Pomodoro feel, a soft bell for yoga‑style study sessions, or a spoken cue (“Break time”) if you’re already listening to music and don’t want the beep to clash.
2. Adjust the volume and pitch. Open the sound settings and slide the volume up just enough to cut through background noise. If you work in a noisy coworking space, crank the decibel a notch higher. In a quiet library, dial it back so you don’t disturb others.
3. Set a pre‑alert countdown. A 3‑second warning before the interval ends gives your brain a heads‑up. It’s like a traffic light turning amber – you can finish the thought you’re on instead of being cut off abruptly.
4. Map alerts to interval names. Name your blocks “Deep‑Work”, “Client Call”, “Stretch”. Then assign a distinct sound to each. When the timer says “Stretch”, you hear a gentle chime that instantly tells you to stand up, no need to glance at the screen.
5. Test across devices. Play a quick test on your laptop, then on your phone. Does the sound travel the same way? If the phone’s speaker mutes the cue, consider enabling vibration as a backup.
Real‑world examples
Student scenario. Emma, a university sophomore, studies in a dorm with a thin wall. She selects a low‑frequency bell for study blocks and a louder, melodic chime for breaks. The contrast makes her instantly recognise when it’s time to pause, even if the door slams behind her.
Remote‑worker scenario. Carlos joins daily stand‑ups on Zoom. He configures a spoken alert that says “End of focus” right before his scheduled break, so his teammates see the cue on his screen and know he’s stepping away, reducing unnecessary interruptions.
Freelancer scenario. Maya runs three client projects in a day. She assigns a soft ping to “Client A” work, a higher‑pitch beep to “Client B”, and a short gong for admin tasks. At the end of the day she can glance at her log and see how many of each sound played, giving her a quick audit of billable time.
Busy‑professional scenario. Raj, a project manager, syncs his timer with his calendar. He uses a subtle vibration for 15‑minute sprint intervals during meetings, ensuring the cue is felt but not heard, keeping the meeting atmosphere professional.
Tips from the field
– Use silence strategically. If you work in a shared space, mute the alert for short micro‑breaks and rely on a visual cue instead.
– Leverage colour‑coded alerts. Pair a red background with a sharp beep for “stop” intervals, and a green background with a soft chime for “go” intervals. Your brain picks up the pattern faster than the sound alone.
– Document your alert palette. Keep a one‑page cheat sheet of which sound matches which task. It saves you from accidentally using the wrong cue after a weekend break.
Quick checklist before you hit play
- Pick distinct sounds for each interval type.
- Set a 3‑second pre‑alert for all work blocks.
- Adjust volume for your typical environment.
- Enable vibration or visual flash as a backup.
- Run a 2‑minute test on every device you’ll use.
Once you’ve fine‑tuned these settings, the timer becomes invisible – you feel the rhythm, not the tool. That’s the sweet spot we aim for at Focus Keeper: an interval timer online that works so quietly in the background you barely notice it, yet reliably nudges you back on track the moment you need it.
Step 4: Compare Top Free and Paid Interval Timer Online Tools
Now that you’ve set up your intervals, the next question is – which timer should actually power your workflow? You’ve probably tried a free web timer that flashes a number, or maybe you’ve paid for a polished app that promises “no‑ads, no‑distractions.” Both routes have merit, but the right choice hinges on the specifics of your routine.
Let’s walk through a quick decision‑making framework that works for students, remote workers, freelancers, and busy professionals alike. Grab a pen, because I’m about to turn this into a mini‑workshop.
1. Identify your must‑have features
Start by listing the three features you can’t live without. For many, it’s custom interval names, cross‑device sync, and audible alerts. Write those down, then compare each tool against that checklist.
Here’s a short example: Emma, a university sophomore, needs a visual cue for study blocks because her dorm is noisy. Carlos, a remote developer, wants the timer to sync with his laptop and phone so he can switch between home and the co‑working space without re‑entering settings. Maya, a freelance designer, cares about branding – she wants to attach a custom sound file to each client’s work session.
2. Free vs. paid – what you actually gain
Free tools are great for a quick start, but they often come with hidden costs: ads, limited interval rounds, or no cloud backup. Paid options usually remove those frictions and add premium features like advanced reporting, haptic feedback, or integration with health apps.
Below is a compact comparison table that captures the most common free and paid players we see in the market. Use it as a quick reference when you’re scrolling through options.
| Tool | Free / Paid | Key Features |
|---|---|---|
| Focus Keeper (web) | Free with optional premium | Custom intervals, colour‑coded alerts, full‑screen mode, cloud sync across browsers |
| Seconds Interval Timer (iOS/Apple Watch) | Paid ($4.99 one‑time) | Voice‑announced interval names, haptic feedback, Apple Health integration, background operation |
| O’Coach HIIT Timer (web & mobile) | Free with in‑app purchases | Pre‑set HIIT templates, music‑sync, visual progress rings, basic analytics |
Notice how the paid Seconds app shines for fitness‑focused users who want health data, while O’Coach offers a generous free tier that’s perfect for quick HIIT sessions. Focus Keeper sits in the middle – you can start for free, then upgrade if you need deeper reporting.
3. Real‑world testing steps
1. Pick two tools that meet your must‑have list.
2. Set up an identical 25‑minute work block with a 5‑minute break in each.
3. Run a 10‑minute test on both your laptop and phone. Note any latency, missed alerts, or sync glitches.
4. Score each on a simple rubric (0–5) for reliability, ease of use, and distraction level.
5. Choose the higher‑scoring tool for your daily routine.
During my own testing, I discovered that the free web version of Focus Keeper was lightning‑fast on a laptop but lagged a bit on a low‑end Android tablet. Switching to Seconds on the phone gave me crisp haptic cues that felt less intrusive in a shared office.
4. Budget‑friendly shortcuts
If you’re on a shoestring budget, start with the free web version and export your interval presets as a CSV (many tools support this). Later, when you feel the need for richer analytics, migrate to a paid app that can import those CSV files – no need to rebuild your whole schedule.
And remember, the cheapest solution isn’t always the best if it forces you to waste mental energy fixing glitches. A $5 upgrade that eliminates ads and adds reliable sync can actually save you hours each week.
5. Making the final call
When you’ve narrowed it down, ask yourself one last question: “Will this tool keep me focused without becoming another thing I have to maintain?” If the answer is yes, you’ve found your match.
For a deeper dive into what an interval timer online actually looks like under the hood, check out our glossary entry. It breaks down the tech behind the timers we just compared, helping you speak the same language as developers if you ever need to tweak settings.
Step 5: Integrate the Timer with Fitness Apps
You’ve got your intervals set up and the sound cues tuned. The next logical step is to let those cues talk to the apps you already use for tracking runs, rides, or even heart‑rate zones. When the timer and your fitness ecosystem speak the same language, you stop guessing and start measuring.
Why integration matters
Imagine you finish a HIIT sprint, but the data never lands in Strava. You end up manually logging the session, risking errors and wasting time. That friction is exactly what many Fitbit users have reported – the built‑in interval timer not syncing to Strava can leave you with a perfect workout on your wrist but a blank activity feed.
When your interval timer syncs automatically, you get a complete picture: total work time, calories burned, and even split data for each interval. It turns a simple timer into a full‑featured training log.
Step‑by‑step: Hook up an online timer to a fitness app
1. Choose a timer that offers export or API access. Web‑based timers often let you download a CSV of your session or push data to third‑party services. If you prefer a native app, look for one that mentions “integrations” in its description.
2. Connect the accounts. Most fitness platforms (Strava, Apple Health, Google Fit) have an “Apps & Devices” section where you can authorize the timer. Follow the on‑screen prompts – it’s usually a one‑click OAuth flow.
3. Map your intervals. Give each block a clear name (“Warm‑up”, “Sprint 1”, “Recovery”). When the timer pushes data, the fitness app will use those names as tags, making it easy to filter later.
4. Test with a short run. Start a 5‑minute interval session, then check the receiving app. If the data appears but the GPS route is missing, double‑check that the timer recorded location – the Fitbit thread notes that only exercises with GPS data sync correctly.
5. Tweak sync settings. Some apps let you choose what to import (distance, heart rate, calories). Turn off anything you don’t need to keep your feed tidy.
Real‑world scenarios
Students often use an interval timer for study sprints, but when they switch to a quick jog between sessions, they want the run automatically logged. By linking the timer to Strava, the run shows up with a “Study‑Break Run” tag, so they can see how many miles they covered during study days.
Remote workers who track “focus blocks” can push those blocks to Google Fit, then pull a weekly report that shows how many minutes they spent in deep work versus meetings. The visual breakdown becomes a conversation starter with managers about productivity.
Freelancers juggling multiple clients love the ability to name intervals by project. Once synced, the fitness app’s export can serve as a rough billable‑hour log – no spreadsheet required.
Tips for a smooth experience
– If you hit the same syncing roadblock described in the Fitbit community, try revoking and re‑authorising the connection. The post suggests that clearing access and reconnecting often fixes the issue.
– Keep the timer’s firmware or app version up to date. Developers frequently add new webhook endpoints that make integration easier.
– For iOS users, the Simple Interval Timer app can push data straight to Apple Health, which then syncs with most third‑party fitness services.
– Use a checklist: (1) timer name set, (2) GPS on, (3) app linked, (4) test run, (5) verify data.
Common pitfalls and how to avoid them
Missing GPS data is the most common complaint. Make sure the “interval timer” mode you choose actually records location – many wearables only log GPS for “Run” or “Walk” activities.
Another snag is duplicate entries. If both the native workout recorder and the timer push the same session, you’ll see two identical rows in Strava. Disable the native recorder for those intervals or set the timer to “silent” mode for the sync.
Finally, don’t forget privacy. Review what data the timer shares – some services export heart‑rate zones that you may not want to broadcast.
By treating your interval timer as a data hub rather than a standalone beep, you get a seamless loop: plan → execute → analyze → improve.
Ready to give your timer a voice in your fitness ecosystem? Take the checklist above, run a quick test, and watch your productivity metrics start to tell a richer story.

Step 6: Tips for Maximizing Your Training Efficiency
Let’s be honest: after you’ve wired up your intervals and hooked the timer to your fitness app, the next hurdle is actually getting the most out of each session.
Does your timer feel like a metronome or a coach? If it’s the former, you’re probably leaving performance gains on the table.
Below are six practical tweaks that turn an “interval timer online” from a simple beep into a training efficiency engine.
1. Match intervals to your natural energy rhythm
We all have moments when our body screams “go” and others when it whispers “slow down.” Start by logging a few sessions without changing anything—just note when you feel most alert.
Then shape your work‑or‑workout blocks around those peaks. For a student, that might mean a 45‑minute study sprint right after breakfast, followed by a 5‑minute stretch. A remote developer may discover that late‑afternoon code dives dip, so schedule lighter admin intervals instead.
Does this sound familiar? If you’ve ever forced a 25‑minute sprint during a post‑lunch slump, you know the difference.
2. Use the timer’s data to fine‑tune intensity
Most interval timers online give you basic stats: total time, number of rounds, and sometimes a simple “average heart‑rate” read‑out. Treat those numbers like a GPS for your effort.
After a week, compare the average heart‑rate of your “high‑intensity” blocks to the “recovery” blocks. If the gap is tiny, you’re not pushing hard enough. If the recovery numbers stay high, dial back the work interval or add a deeper cool‑down.
In our experience, a 5‑% adjustment—either longer work bursts or slightly higher tempo—can shave minutes off a marathon training plan without adding injury risk.
3. Pair movement with purposeful rest
Rest isn’t just “stop moving”; it’s an active reset. During a 30‑second break, try a quick mobility drill—ankle circles, shoulder rolls, or a few deep breaths. That micro‑movement keeps blood flowing and prepares the next sprint.
Freelancers juggling client calls love a “stand‑up‑and‑stretch” cue because it clears mental fog before the next Zoom.
Try it for a day and notice whether you feel “wired” or “refreshed” after each interval.
4. Apply progressive overload with the timer
Just like lifting heavier weights, you can make your intervals harder over time. Add 10 seconds to the work period each week, or shave 5 seconds off the rest. The key is consistency—small, measurable steps keep the body adapting without overwhelming it.
Students prepping for finals often start with 20‑minute focus blocks and, after a few days, bump to 25 minutes. The sense of achievement fuels motivation.
Remember, the timer will automatically calculate the new total, so you don’t have to re‑enter the whole schedule.
5. Sync with your fitness ecosystem for a feedback loop
If you already track runs or workouts in Strava, Apple Health, or Google Fit, connect the interval timer so every sprint shows up as a distinct activity. That way you can see, at a glance, how many “focus sprints” you’ve logged in a week alongside your cardio miles.
Seeing that you’ve completed ten 45‑minute deep‑work blocks can be just as motivating as a new personal record in a run.
Need a quick guide? The demonstration video walks through the basic sync steps for popular apps.
6. Quick checklist before you hit play
- Identify your energy peak and schedule the toughest blocks there.
- Log heart‑rate or perceived exertion for work vs. rest.
- Add a micro‑movement cue to every break.
- Increase work time or decrease rest by 5‑10 % each week.
- Connect the timer to your favorite fitness tracker.
- Run a 2‑minute test to confirm alerts and sync.
Follow these habits for a couple of weeks and you’ll notice sharper focus, smoother recovery, and more consistent progress—whether you’re cramming for an exam, delivering a client prototype, or training for a 5K.
Conclusion
You’ve walked through the why, the how, and the fine‑tuning of an interval timer online, so now it’s time to let that knowledge work for you.
Think about the last time you lost track of a break because the beep was too soft, or when you stared at a cluttered dashboard and felt your focus drift. Those moments are exactly what a well‑chosen interval timer online eliminates.
In our experience, the biggest jump in productivity comes from three simple habits: set a clear purpose for each block, sync the timer with the tools you already use, and treat the alerts as gentle nudges rather than harsh alarms.
So, what should you do next? Grab your favourite timer, create a 25‑minute focus sprint with a 5‑minute stretch break, and run a two‑minute test on both your laptop and phone. If the sound feels right and the screen stays clean, lock that preset and use it daily.
Remember, the timer is a partner, not a taskmaster. Adjust the work‑to‑rest ratio by 5 % each week, log a quick note on how you felt, and let the data guide your tweaks.
When the rhythm feels natural, you’ll notice sharper focus, smoother recovery, and more momentum across study sessions, client calls, or training runs. Keep the cycle simple, stay curious, and let the interval timer online become the quiet engine powering your best work.
Finally, treat this as an ongoing experiment rather than a one‑off setup. Revisit your intervals every month, celebrate the small wins, and tweak anything that feels stale. That mindset turns a simple interval timer online into a lifelong productivity habit.
FAQ
What is an interval timer online and how does it differ from a regular timer?
An interval timer online is a web‑based tool that counts down a series of work and rest periods, automatically switching between them. Unlike a simple stopwatch, it lets you pre‑set multiple segments, name each block, and often store presets in the cloud. Because it runs in a browser, you can access it from any device with internet, so you never have to reinstall an app.
Can I use an interval timer online on both my computer and phone without losing my settings?
Yes – most modern interval timers online store your presets in your browser’s local storage or sync them to a cloud account. When you log in on a laptop, set up a 25‑minute focus block and a 5‑minute break, the same configuration appears on your phone’s browser after you sign in. Just make sure cookies are enabled and you’ve saved the preset before switching devices.
How do I choose the right work‑to‑rest ratio for studying versus workouts?
The sweet spot depends on what you’re training. For study sessions most people stay sharp for 20‑30 minutes, so a 25‑minute work slot followed by a 5‑minute stretch works well. For HIIT workouts you might flip it: 30 seconds high intensity, 10 seconds rest, repeated for 8‑12 rounds. Experiment by starting with the classic Pomodoro rhythm, then tweak the lengths by 5‑10 % until the effort feels natural.
What are the best practices for setting up alerts so they’re noticeable but not disruptive?
Start with a sound that cuts through your typical environment – a crisp beep for a quiet office, a low‑frequency chime for a noisy café. Set the volume just high enough to be heard without startling coworkers, and enable a 3‑second pre‑alert so you can finish the thought you’re in. If you work on video calls, pair the audio cue with a subtle screen flash or colour change to keep the interruption minimal.
Is it possible to sync an interval timer online with my calendar or task manager?
Many interval timers online offer a simple “Export to CSV” or a direct webhook that you can point at Google Calendar, Todoist, or Notion. After you create a preset, click the export button, then import the file into your calendar as a recurring event, or set up the webhook to create a new task each time a round finishes. This keeps your focus blocks visible alongside meetings without manual copy‑pasting.
How can I track progress over time with a free interval timer online?
Even free tools usually keep a log of how many rounds you’ve completed and the total time spent. Open the timer’s history panel after a week of use and note the cumulative minutes for work versus rest. Export that data to a spreadsheet, add a column for perceived effort, and look for patterns – maybe you’re consistently extending breaks on afternoons. Those insights let you fine‑tune the ratio without paying for a premium analytics dashboard.
What should I do if the timer’s sound cuts out during a session?
If the beep stops mid‑session, first check your device’s volume and any “Do Not Disturb” settings that might mute alerts. On a laptop, make sure the browser tab isn’t muted (right‑click the tab and look for “Unmute”). On a phone, verify that the app isn’t running in battery‑saving mode, which can throttle background sounds. A quick test run after adjusting these settings usually restores the cue.