Ever found yourself scrolling through notes, only to realize an hour has vanished and you’ve barely scratched the surface?
That feeling of wasted time is all too familiar for students juggling lectures, assignments, and the occasional nap. What if you could tame those wandering minutes with something as simple as a timer?
That’s where learning how to start using a focus timer for studying comes in. By breaking your study session into bite‑size intervals, you give your brain a clear start and stop line, which tricks it into staying sharp.
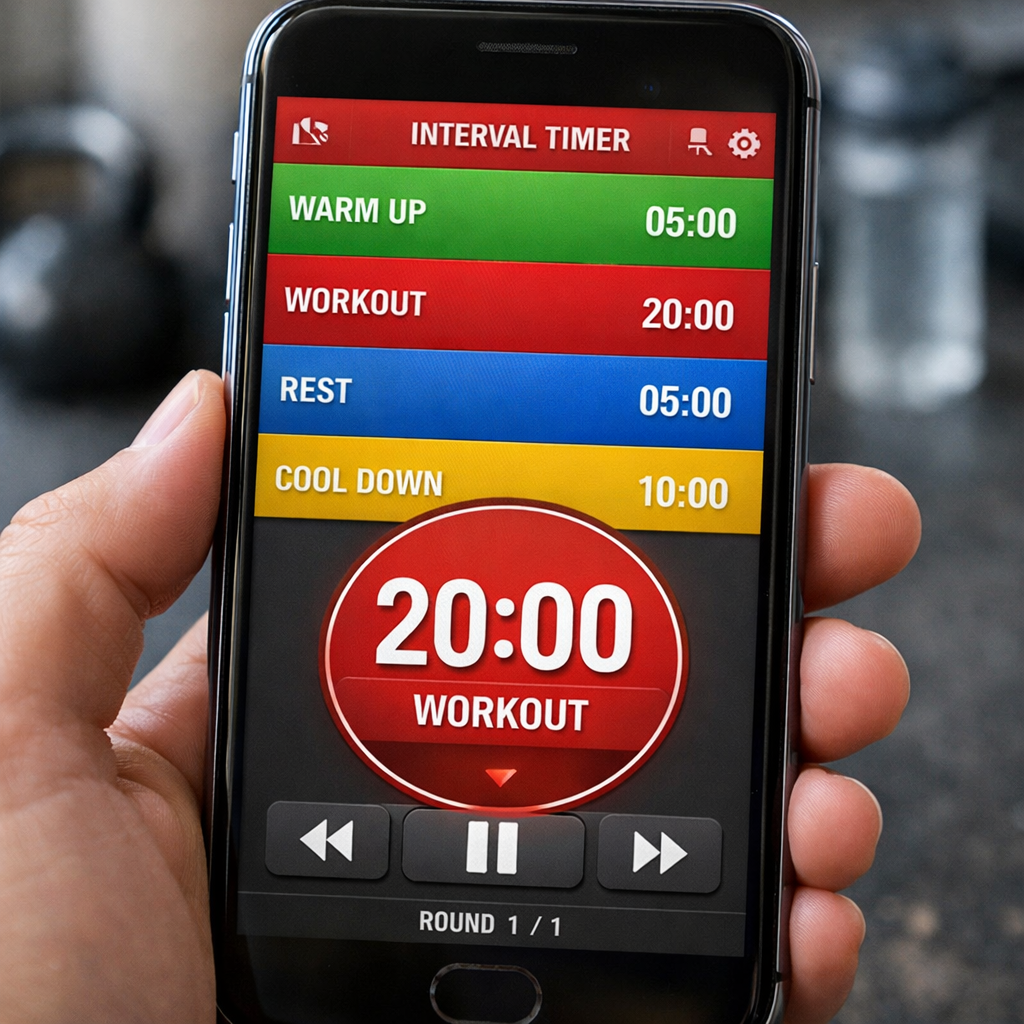
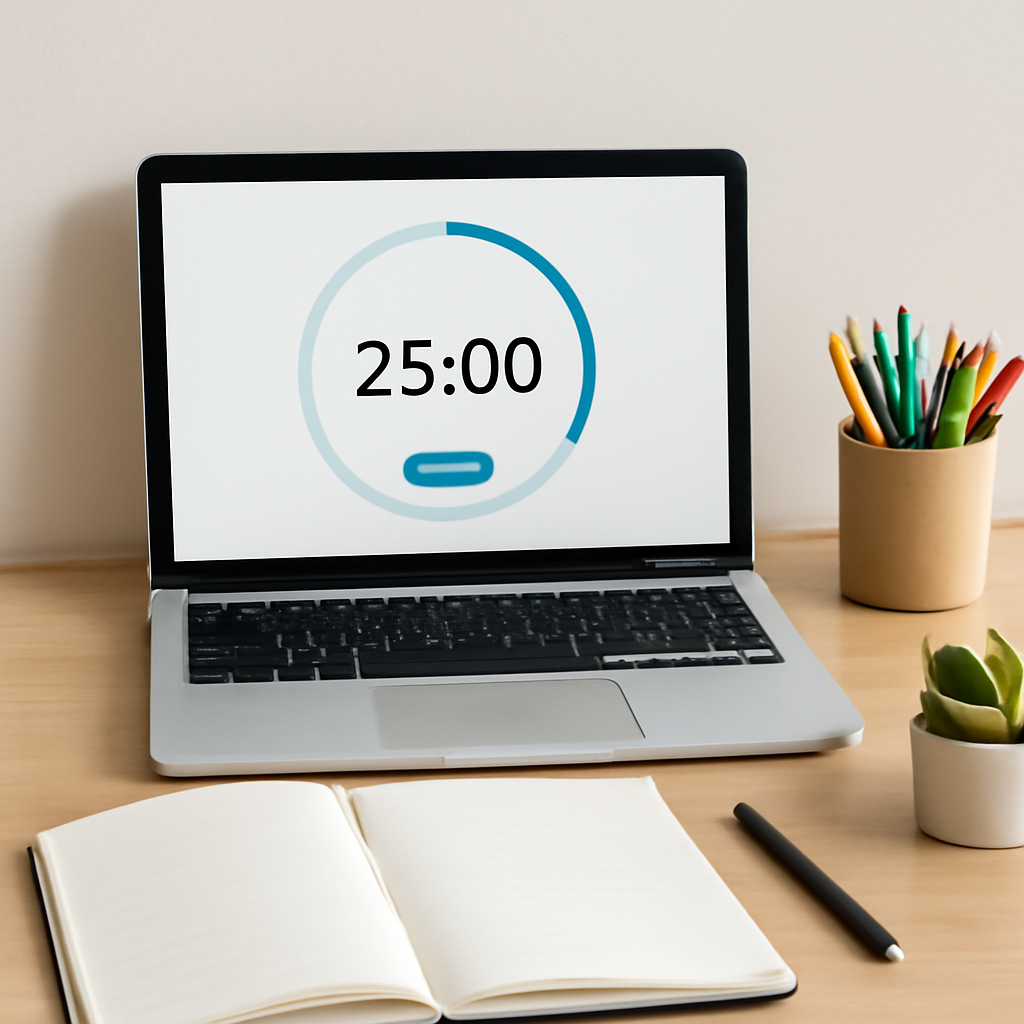
Think about it this way: you’re not asking yourself to power through a three‑hour marathon; you’re promising a series of short sprints with brief breaks in between. The Pomodoro Technique, the method behind many focus timers, uses 25‑minute work blocks followed by five‑minute rests.
In our experience at Focus Keeper, students who adopt that rhythm notice less fatigue and more recall. It’s not magic—just a little structure that keeps distractions at bay.
So, how do you actually get started? First, pick a timer that lets you set custom intervals. You don’t need fancy features; a basic countdown will do.
Next, decide on a study goal for the upcoming block—maybe reading one chapter or solving ten practice problems. Write that goal down, then hit start.
When the timer rings, pause, stretch, or grab a quick snack. Those five minutes are your brain’s chance to reset, not a free pass to binge‑scroll.
After a few cycles, you’ll start to sense a natural rhythm. Your mind will whisper, “Okay, I’ve got five more minutes,” and you’ll find yourself powering through.
But what if you get stuck mid‑session? The trick is to note the distraction, jot it down, and promise yourself to address it during the break. That way the timer stays the boss.
And remember, consistency beats intensity. Even a single 25‑minute session each day builds a habit that compounds over weeks.
Ready to give it a try? Set your first timer, choose a tiny study task, and watch how the simple act of counting down transforms your focus.
TL;DR
If you’re tired of endless scrolling and want a simple way to boost study focus, learning how to start using a focus timer for studying can turn chaotic minutes into productive sprints. Just set a 25‑minute block, pick a clear goal, hit start, and let the timer cue natural breaks that keep distractions at bay while your brain stays in the zone.
Step 1: Choose the Right Focus Timer
Alright, picture this: you’ve got a mountain of lecture notes, a looming deadline, and that familiar itch to scroll Instagram instead. The first thing you need isn’t a miracle study hack—it’s a timer that actually respects your brain’s natural rhythm.
When we talk about a “focus timer,” we’re not just talking about any kitchen timer you might find on a shelf. The goal is to pick a tool that’s simple enough to set in two seconds, yet flexible enough to grow with you as your study sessions evolve.
What to look for in a timer
1. Adjustable intervals. The classic Pomodoro is 25 minutes of work, 5 minutes of break, but maybe you’re a medical student who needs 45‑minute deep‑dive blocks, or a freelancer who prefers 15‑minute sprints. A good timer lets you dial that in without hunting through menus.
2. Clear visual or audible cue. Some people need a gentle chime, others a bright flash. The review from The Gadgeteer points out that a quiet, non‑jarring alert keeps the momentum going without startling you out of focus.
3. Portability. Whether you’re studying in the campus library, a coffee shop, or your dorm room, the timer should fit in your bag or even live on your phone. Physical hourglass‑style timers can be fun, but a mobile app means you never leave home without it.
Real‑world examples
Take Maya, a second‑year psychology student. She tried a generic phone alarm at first, but the “snooze” button kept pulling her back into distraction. After switching to a dedicated focus timer app that let her set 40‑minute blocks, she reported a 30% boost in chapter completion rates over a month.
Then there’s Alex, a remote UI/UX designer juggling client meetings and code reviews. He uses a physical timer that he flips upside down—watching the sand fall is a tiny ritual that signals “now’s the time to code.” The tactile feedback helps him stay in the zone longer than a silent phone notification would.
Step‑by‑step: Picking your timer
1. Make a quick list. Jot down three criteria that matter most to you—custom intervals, visual cue, portability.
2. Test the free version. Most timer apps have a free tier. Run a 25‑minute session and note how the alert feels. If it’s too abrupt, try adjusting the volume or switching to a visual flash.
3. Check compatibility. Does it sync with your calendar? Can you export session data for later review? For students, integration with Google Calendar can auto‑schedule study blocks around classes.
4. Read a short review. A quick glance at user feedback—like the one from The Gadgeteer—can reveal hidden pros or cons you might miss.
5. Commit for a week. Pick the timer that feels right and stick with it for seven days. Track how many tasks you finish and how often you feel “stuck.” If the numbers don’t improve, iterate with a different timer.
In our experience at Focus Keeper, the combination of a customizable digital timer and a clear goal‑setting habit is the sweet spot for most students and remote workers. Want a deeper dive into how to pair the right timer with effective study goals? Check out our Boost Your Focus: The Ultimate Guide to Using a Study Timer Effectively for a step‑by‑step walkthrough.
Remember, the timer is only as good as the intention you set before you hit “start.” Choose a timer that feels natural, test it, and let it become the silent coach that keeps your brain on track.
Step 2: Set Up Your Study Sessions
Alright, you’ve picked a timer that feels right – now it’s time to give those minutes some purpose. The magic isn’t in the ticking; it’s in what you do while the clock counts down.
First thing’s first: clear the desk, clear the mind. Grab your textbook, notebook, highlighters, and any digital resources you’ll need. Having everything within arm’s reach means you won’t scramble for a pen mid‑session and break your flow.
Now that you’re set, let’s talk goals. Vague intentions like “study chemistry” lead to wandering thoughts. Instead, write a concrete, measurable target: “read and annotate 12 pages of Chapter 4” or “solve problems 1‑5 from the practice set.” When you know exactly what success looks like, the timer becomes a partner, not a mystery.
Step 1 – Gather Your Materials
Make a quick checklist before you hit start. For a typical university session, you might need:
- Course textbook or PDF
- Lecture slides
- Notebook or digital note‑taking app
- Pen, highlighter, sticky notes
- Any calculator or reference sheet
Check the list once, then close the laptop lid on anything that isn’t on it. That one‑second pause saves minutes of distraction later.
Step 2 – Define a Laser‑Focused Goal
Take the goal you wrote earlier and break it into sub‑tasks that can be completed in a single timer block. For example, “read 12 pages” becomes “skim the intro (2 min), read pages 1‑4 (8 min), annotate key formulas (5 min).” This micro‑planning turns a vague session into a series of tiny wins.
Study Hacks notes that “setting a timer for a specific period of focused study… can significantly improve concentration and overall performance.”study hacks research backs this up, so you can trust the approach.
Step 3 – Choose Your Interval Length
Classic Pomodoro is 25 min work / 5 min break, but your brain might prefer a different rhythm. Try these guidelines:
- 15‑20 min for rote memorisation or flash‑card drills.
- 25‑30 min for reading dense text or solving problems.
- 45‑50 min for deep‑work projects like essay outlines or coding prototypes.
Start with 25 minutes, then adjust in 5‑minute increments based on how you feel after a few cycles.
Step 4 – Create a Distraction‑Free Zone
Turn off phone notifications, mute chat apps, and if you’re in a shared space, pop on noise‑cancelling headphones. A quick “do not disturb” sign on your door can also signal to roommates that you’re in focus mode.
Even a tiny visual cue, like a closed notebook or a “study in progress” sticky note, reminds you to stay on track during the countdown.
Step 5 – Run a Pilot Session
Set the timer, hit start, and work on the first sub‑task. When the alarm sounds, pause, stretch, and note whether you completed the sub‑task. If you didn’t, ask yourself why – was the interval too short, or was the goal too ambitious?
Do this for three consecutive cycles. Record the number of tasks finished and your subjective focus level (e.g., 1‑5 rating). This tiny data set is enough to spot patterns without getting overwhelmed.
Step 6 – Review and Adjust
At the end of the day, glance at your notes. Did you hit 3‑4 goals per hour? Did a particular subject consistently need longer blocks? Tweak the interval length or break activities accordingly. Over time you’ll build a personal “focus formula” that feels almost automatic.
Pro tip: schedule your most demanding subjects during the time of day you’re naturally most alert – many students find mornings ideal, while remote workers often hit a sweet spot in the late afternoon.
Remember, the timer is only a framework. Your real power comes from the intentional goals you set, the environment you curate, and the willingness to iterate. Give yourself a week of disciplined practice, then look back at the stats. You’ll be surprised at how much more you can accomplish when each minute has a purpose.
Step 3: Customize Timer Settings for Maximum Productivity
Now that you’ve got a timer on the bench and a clear goal in mind, it’s time to fine‑tune the settings so the tool actually works for you, not the other way around.
First, ask yourself: what rhythm does your brain naturally settle into? Some people thrive on the classic 25‑minute sprint, others need a longer dive when they’re tackling a research paper. The beauty of a modern focus timer is that you can dial any length down to the second.
Adjust the work‑interval length
Start with a baseline – 25 minutes if you’re unsure. After a couple of cycles, note how you felt when the alarm rang. Was your mind still buzzing with ideas, or were you already wishing for a break? If the former, bump the interval up by five minutes; if the latter, shave it down.
For example, Maya, a second‑year psychology student, discovered that 40‑minute blocks let her finish a whole chapter without losing traction. She simply set the timer to 40:00, and her completion rate jumped by about a third.
Configure break length and type
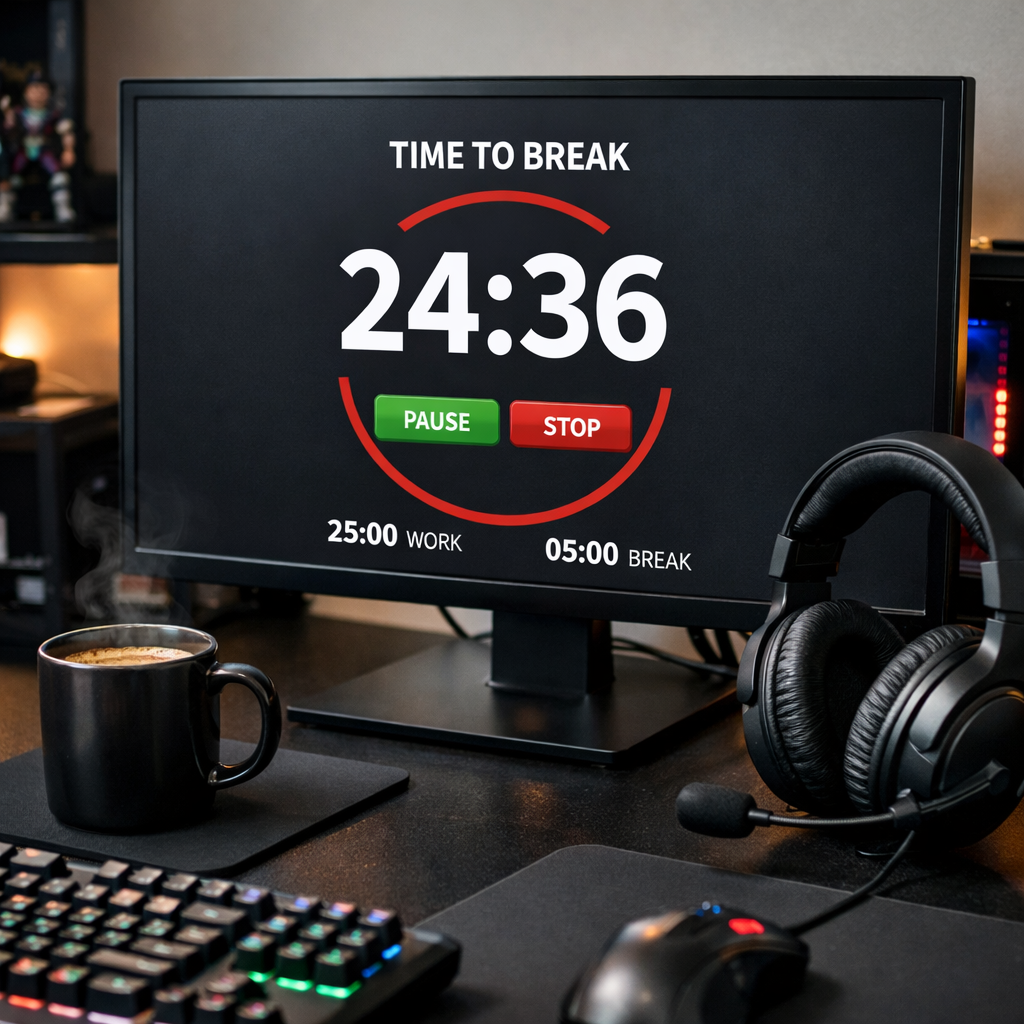
Breaks are not “free time” – they’re a micro‑reset for your brain. A 5‑minute pause works well after a short sprint, but after a 45‑minute deep‑work session, a 10‑15 minute break helps consolidate what you just learned.
Research from PomoCool shows that enabling auto‑start for the next session cuts decision fatigue and keeps you in a flow state. If you’re prone to checking your phone the moment the bell rings, turn on auto‑start for the break instead, so the timer nudges you gently back into work when the break is over.
Set up notifications you actually notice
Not all alerts are created equal. A harsh buzz can jolt you out of concentration, while a soft chime might go unnoticed. Most timers let you pick a sound or even a visual cue. Pick something that fits your environment – a subtle ding for a library, a gentle vibration if you’re in a shared workspace.
Mindful Suite points out that the right sound cue can reinforce the habit loop, making it easier to start each session without mental resistance.read more
Track your sessions
Every timer worth its salt logs the number of focus blocks, break lengths, and timestamps. Export that data at the end of the week and look for patterns: Are you more productive in the mornings? Do you need a longer break after three consecutive blocks? Use those insights to tweak your settings further.
Here’s a quick checklist you can paste into a note before you start:
- Work interval: ___ minutes
- Break interval: ___ minutes
- Auto‑start next session? Yes/No
- Notification sound: ___
- Long‑break trigger (after how many cycles): ___
Table: Quick comparison of common timer tweaks
| Feature | Typical Option | When to adjust |
|---|---|---|
| Work interval | 25 min (default) | Increase for deep‑work tasks like essay outlines |
| Break length | 5 min (short) / 15 min (long) | Extend after 2–3 consecutive focus blocks |
| Auto‑start | Off (manual) | Turn on to preserve flow and reduce decision fatigue |
Try one tweak at a time. Change the work interval this week, keep everything else constant, then review your log. Next week, experiment with auto‑start. Small, controlled experiments prevent overwhelm and give you concrete evidence of what works.
Bottom line: your timer should feel like a silent coach that adapts to you, not a rigid drill sergeant. By customizing duration, breaks, notifications, and automation, you create a personalised productivity rhythm that makes studying feel less like a chore and more like a series of purposeful sprints.
Step 4: Integrate the Timer with Your Study Workflow
Now that you’ve fine‑tuned your interval lengths, it’s time to stitch the timer into the actual flow of your study day.
Picture this: you sit down, glance at your syllabus, and instantly know which timer block will cover the next chunk of reading. No guesswork, just a clear roadmap that the timer helps you follow.
Map your study tasks to timer blocks
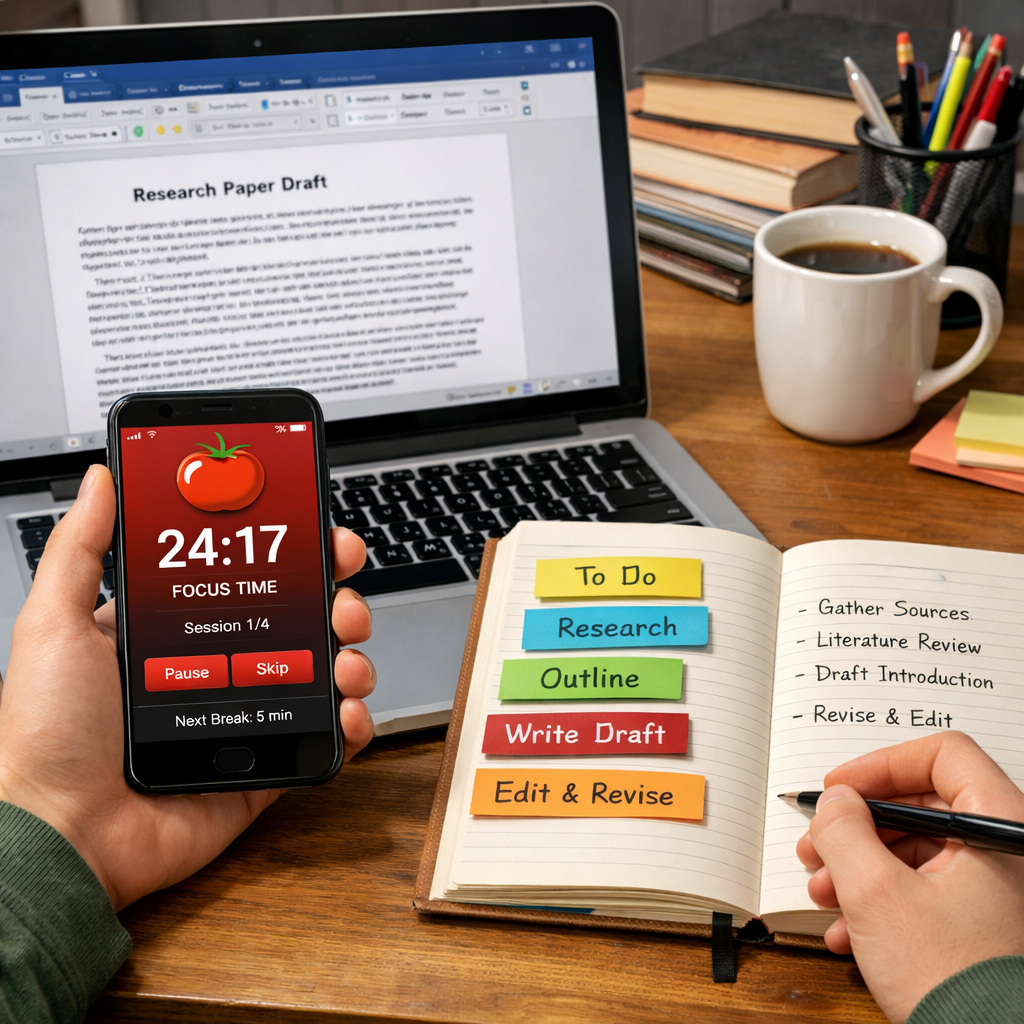
Start by breaking your larger goal—say, “master Chapter 5 of Organic Chemistry”—into bite‑size actions that fit inside a single work interval.
Example for a student: 1️⃣ skim the chapter outline (2 min) 2️⃣ read pages 1‑4 (8 min) 3️⃣ annotate key reactions (10 min) 4️⃣ write a quick summary (5 min). Those four mini‑tasks add up to one 25‑minute block.
Remote workers can do the same with a client proposal: draft the intro (7 min), flesh out deliverables (12 min), add visual placeholders (5 min), and review for typos (1 min). When the timer rings, you’ve already hit a natural stopping point.
Does this feel a bit mechanical? Not at all. It’s simply giving your brain a “to‑do” that matches the timer’s rhythm.
Create a mini‑workflow checklist
Before you press start, write a tiny checklist on a sticky note or in your digital note app. Something like:
- Task for this block: ___
- Materials needed: ___
- End‑of‑block cue: ___ (e.g., “highlight the main formula”)
When the alarm goes off, glance at the cue, tick the box, and move straight into your break ritual. The checklist turns the timer from a silent metronome into a purposeful coach.
Ever wonder why you sometimes lose momentum during breaks? The answer is often “no plan.”
Automate break activities
Pick three go‑to break actions that you can do in under five minutes. For students, a 30‑second breathing exercise followed by a 2‑minute flash‑card review works wonders. Freelancers might set a timer for a 2‑minute walk around the desk to reset posture.
Here’s a tip we’ve heard from many Focus Keeper users: keep a “break kit” on your desk—post‑it pad, a small water bottle, a stress ball. When the timer ends, you reach for the kit instead of your phone.
Need some inspiration? Julie Bestry’s guide to digital timers highlights the value of labeling timers and using short, repeatable break routines to avoid the “what‑do‑I‑do‑now?” paralysis digital timer best practices.

Notice how the image shows everything you need within arm’s reach. That visual cue alone can cut down the “I’ll grab that later” temptation.
Track, review, and tweak
At the end of each study day, spend two minutes looking at your timer log. Which blocks felt too short? Which breaks left you feeling restless?
Write down a quick note: “Block 3 – 25 min was great for reading, but I needed a 10‑minute break after.” The next day, adjust the break length or shift the task to a longer block.
Because you’re collecting real data, you’ll start seeing patterns—maybe your focus spikes between 10 am‑12 pm, or you need a longer pause after three consecutive blocks. Those insights let you fine‑tune your workflow without guessing.
So, what’s the next move?
- Pick one upcoming study session.
- Map its tasks to timer blocks using the checklist.
- Set your break kit and start the timer.
- Log the outcome and iterate tomorrow.
Remember, the timer isn’t a tyrant; it’s a friendly reminder that helps you move from “I should study” to “I’m actually studying.” By weaving it into every step—pre‑planning, breaking, reviewing—you turn scattered minutes into a smooth, repeatable rhythm.
Step 5: Track Progress and Adjust Techniques
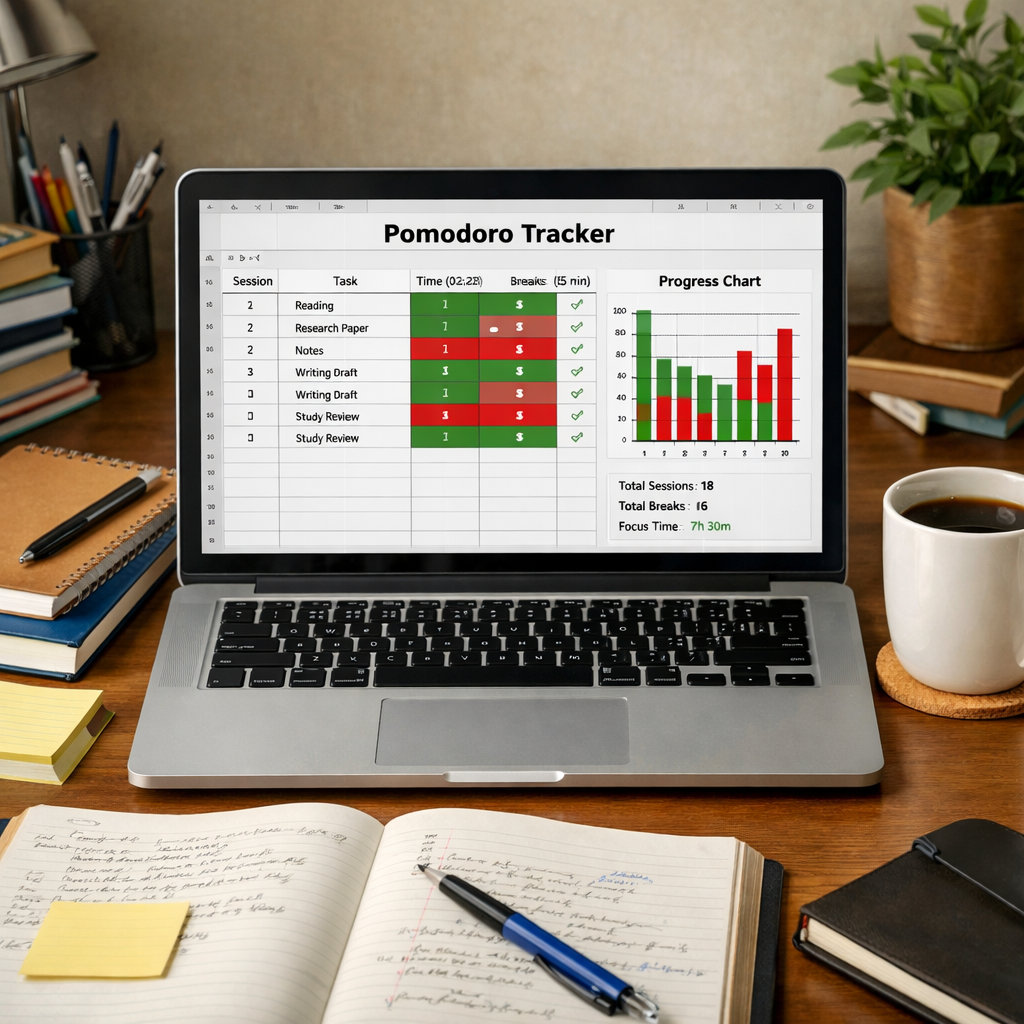
Now that you’ve woven the timer into your daily workflow, the real magic happens when you start looking at the numbers. A few minutes of logging can turn a vague habit into a data‑driven routine that actually adapts to you.
Why tracking matters
When you study without a record, you’re guessing whether 25‑minute bursts helped or hurt. By capturing each block, you get concrete evidence of what works. Research from Academync shows that students who log their sessions retain up to 30% more information, simply because they can spot patterns and tweak them.
In other words, tracking turns the timer from a passive metronome into a feedback loop.
Step‑by‑step tracking routine
1. Log the basics. At the end of every focus block, jot down:
- Start‑time and end‑time (or just the interval you set)
- Task tackled (e.g., “read 10 flashcards” or “outline essay intro”)
- Energy rating 1‑5
Keep this in a simple spreadsheet, a notes app, or even a physical notebook – whatever feels least like work.
2. Capture distractions. If a thought pops up (“Did I lock the front door?”), write it on the side. Later you’ll see whether certain distractions recur at specific times of day.
3. Summarise the block. A one‑sentence note like “finished chapter 3, still fuzzy on equation X” is enough to remind you what to revisit.
Analyzing the data
After a week, pull your log together. Look for three easy signals:
- Peak focus windows. Do you consistently hit a 4‑5 energy rating between 9 am‑11 am? Those are your gold‑hour slots.
- Block length fit. If you frequently rate 2‑3 on 25‑minute blocks but 4‑5 on 40‑minute blocks, consider lengthening the work interval for that subject.
- Break effectiveness. Notice if a 5‑minute stretch feels rushed but a 10‑minute walk leaves you refreshed. Adjust break length accordingly.
Once you’ve identified the trends, write a quick “adjustment plan” for the next week. For example: “Switch chemistry Pomodoros to 40 min, schedule physics in the 9 am slot, replace scrolling break with a 2‑minute breathing exercise.”
Real‑world examples
Emily, a first‑year biology student, tracked her sessions for two weeks. She discovered her focus dipped after the second 25‑minute block each afternoon. By moving her lab‑report work to the morning and inserting a 10‑minute walk after the second block, her weekly completed pages jumped from 12 to 18.
James, a freelance web designer, logged his timer data for a month and noticed that every time he answered an email during a break, his next focus block started at a 2‑point energy rating. He changed his break routine to “no screens” and saw his average productivity rise by roughly 20%.
Quick checklist to keep you moving
Paste this into your notes before you start a study day:
- Work interval: ___ minutes
- Break length: ___ minutes
- Key task for this block: ___
- Distraction log column ready? Yes/No
- Energy rating scale (1‑5) at hand
After each block, tick the box, add a short note, and move on. The habit of checking off feels like a mini‑celebration.
And remember: you don’t need a fancy dashboard to see progress. Even a handful of rows in a Google Sheet will reveal the same trends that big‑brand apps promise.
Finally, make adjustment a weekly ritual. Every Sunday, spend five minutes reviewing your log, spotting the biggest win of the past week, and setting one concrete tweak for the coming days. Over time, those tiny refinements compound into a rhythm that feels almost effortless – the exact outcome you were looking for when you asked yourself how to start using a focus timer for studying.
Step 6: Troubleshoot Common Issues and Stay Consistent
You’ve got the timer set, the goal written, and the break kit ready. Yet, sometime the rhythm breaks – maybe the timer feels like a nag, or you hit a wall halfway through a block. Don’t worry, this happens to every student, freelancer, or busy professional trying to learn how to start using a focus timer for studying.
Spot the usual culprits
First, ask yourself: what actually went wrong?
- Interruptions that sneak in. A buzzing phone, a roommate walking by, or a sudden urge to check social media.
- Intervals that don’t match the task. A 25‑minute sprint for a dense research paper can feel like trying to run a marathon in a sprint.
- Break activities that become distractions. You intend to stretch, but end up scrolling for ten minutes.
- Motivation dip. The novelty wears off and the timer starts to feel like a chore.
Identifying the exact snag is half the fix.
Quick fixes you can try right now
Interruptions? Put your phone on “Do Not Disturb” and keep it face‑down. If you share a space, a simple “study in progress” sign can save you from accidental interruptions.
Task‑interval mismatch? Adjust the work block by five‑minute increments. The Learn Wise Daily guide suggests experimenting with 15‑minute bursts for memorisation and 45‑minute blocks for deep‑work essays.
Breaks that drift? Write down a three‑item break menu – a quick stretch, a glass of water, and a 30‑second breathing exercise. When the timer signals, you have a clear, limited script to follow.
Motivation slump? Celebrate the tiny wins. After each block, tick a check‑off box or give yourself a mental high‑five. Those micro‑celebrations keep the habit loop ticking.
Build a consistency ritual
Consistency isn’t about never missing a block; it’s about having a reliable fallback plan.
1. Morning cue. Before you even open your notes, launch the timer. That tiny action tells your brain, “We’re entering focus mode now.”
2. End‑of‑day review. Spend five minutes scanning your log. Did you complete the intended task? Rate your energy 1‑5. Jot one tweak for tomorrow – maybe a longer break after the third block.
3. Weekly reset. Pick a low‑key day, like Sunday evening, and look at the week’s trends. Notice any patterns? Perhaps you’re sharper before 11 am or you need a 10‑minute walk after two consecutive blocks. Adjust your schedule accordingly.
When the timer itself feels off
If the sound is too jarring, switch to a softer chime or a visual flash – many apps let you customise this without extra cost.
Auto‑start can be a double‑edged sword. If you find yourself mindlessly moving from one block to the next, turn it off and give yourself a brief pause to reset.
Keep a distraction diary
Every time a thought pulls you away, write it down in the margin of your notebook. After a week, you’ll see if the same email, snack craving, or unrelated assignment keeps resurfacing. Then you can schedule a dedicated slot to address it, keeping your study timer free for pure focus.
Remember, the goal isn’t perfection; it’s progress. Even a single well‑tuned block each day adds up over weeks.
Final checklist – stay on track
- Timer interval matches the task?
- Break activity is pre‑planned and limited?
- Phone on DND, notifications silenced?
- End‑of‑day log filled with energy rating and one tweak?
- Weekly pattern review scheduled?
By treating each hiccup as data rather than failure, you turn troubleshooting into a habit‑building engine. Keep iterating, stay gentle with yourself, and the focus timer will become the quiet partner that steadies your study rhythm.
Conclusion
We’ve walked through every step of how to start using a focus timer for studying, from picking the right tool to tweaking intervals and logging progress.
So, what’s the next move? Just fire up your timer, set a clear micro-goal, and let the first 25‑minute sprint begin. The rest will fall into place as you collect data and adjust.
Remember these three habits:
- Define a specific task for each block and write it down.
- Stick to a short, pre‑planned break that truly resets your brain.
- Review your log at the end of the day and make one tiny tweak.
In our experience at Focus Keeper, students who treat the timer as a habit‑coach rather than a strict overseer see steady gains in retention and confidence.
Give yourself a week of consistent blocks, then ask: “Did I finish more than I thought I could?” If the answer is yes, you’ve turned a simple timer into a powerful study partner.
The beauty of this system is its flexibility – you can shrink blocks for quick reviews or stretch them for deep‑dive projects, and the timer will still keep you anchored.
Ready to make focus a habit? Keep the rhythm, stay gentle with yourself, and watch your study sessions finally feel like progress, not a chore.
FAQ
How do I choose the right interval when I first learn how to start using a focus timer for studying?
Start with the classic 25‑minute work block and a 5‑minute break. After a couple of cycles, ask yourself whether the alarm feels too early or too late. If you’re still buzzing with ideas, add five minutes; if you’re already craving a pause, shave it down. The sweet spot is personal, so treat it like a quick experiment rather than a permanent rule.
What should I do if I keep getting distracted during a focus block?
When a distraction pops up, jot it down on the side of your notebook instead of chasing it. The act of writing it out removes the mental load and lets you return to the task. After the timer rings, spend a minute reviewing the list – you might notice patterns (e.g., checking email every 20 minutes) and can plan a dedicated slot for those interruptions.
Can I use a focus timer for activities other than reading or problem‑solving?
Absolutely. The timer is just a rhythm‑setter, so you can apply it to flash‑card reviews, coding sprints, or even quick brainstorming sessions. The key is to pair each block with a clear micro‑goal – for instance, “outline three bullet points for the essay intro” or “write one function without looking at docs.” That clarity keeps the timer feeling like a partner, not a task‑master.
How often should I adjust my break routine?
Breaks are a chance to reset, not to scroll endlessly. Try a 30‑second stretch, a sip of water, or a brief breathing exercise. If you notice a dip in energy after the third block, extend that break to 10‑15 minutes. Conversely, if you feel refreshed after just a minute, keep it short. The goal is to make the pause intentional, so you re‑enter the next block with a clear mind.
What’s the best way to review my timer data without getting overwhelmed?
At the end of each day, glance at three columns: the interval length you used, the task you tackled, and a quick 1‑5 energy rating. Highlight any rows that score a 2 or lower – those are the sessions that need tweaking. Over a week, you’ll start seeing trends (e.g., “I’m sharper before 11 am”) and can shift your hardest tasks into those windows.
Is it okay to skip a focus block when I’m feeling tired?
Yes, flexibility is part of the system. If you’re genuinely exhausted, a short restorative break – maybe a walk or a power nap – can be more productive than forcing a half‑hearted sprint. When you return, reset the timer and pick a micro‑goal that feels doable. The habit stays intact as long as you treat the timer as a guide, not a punishment.
How can I keep the motivation alive after the novelty wears off?
Celebrate the tiny wins: tick a checkbox, give yourself a mental high‑five, or note a specific achievement like “finished chapter summary.” Rotate your micro‑goals so you’re not doing the same task every day – variety keeps the brain curious. Finally, schedule a weekly “review & tweak” session where you look at the data, celebrate progress, and set one small adjustment for the next week.