Ever stare at the clock and feel the day just melt away, even though you’ve been glued to your screen?
That’s the exact spot where most of us lose track of the time we actually spend being productive. If you could see, in real‑time, how many focused minutes you’ve logged, the whole picture changes.
That’s why we love the idea of learning how to track productive hours with a timer. It’s not about micromanaging every second; it’s about giving yourself a clear signal when you’re in the zone and when a break is due.
Imagine you’re a student cramming for finals. You set a 25‑minute Pomodoro, dive into a chapter, and the timer ticks down. When it dings, you know exactly how much solid study time you just earned.
Or think about a remote worker juggling meetings, emails, and a big project deadline. A simple timer lets you carve out uninterrupted blocks, and the numbers at the end of the day tell a story you can actually trust.
Freelancers often hop between clients, and busy professionals juggle endless tasks. By tracking productive hours with a timer, you can spot which activities truly move the needle and which are just busy‑work fluff.
In our experience, the moment you start seeing a visual tally—like a green bar filling up—you get a tiny dopamine hit that fuels more focus. It’s a feedback loop that turns abstract effort into concrete progress.
But here’s a common snag: many people set a timer and then get distracted, thinking the timer alone will do the work. The trick is pairing the timer with a clear intention: decide the specific task before you start, and treat the timer as a guard for that commitment.
So, what should you do first? Pick a timer method that feels natural—whether it’s a classic kitchen timer, a phone app, or a Pomodoro‑style tool. Then, write down the task, hit start, and commit fully until the alarm rings.
When the session ends, take a quick note of what you accomplished. Over a week you’ll have a simple spreadsheet of productive minutes that reveals patterns you never noticed before.
That little habit can turn vague “I was busy” feelings into solid data you can act on—adjusting schedules, negotiating workloads, or simply celebrating wins.
Ready to give it a try? Grab a timer, set a goal, and watch how tracking productive hours with a timer reshapes your day, one focused block at a time.
TL;DR
Use a simple timer to turn vague busy‑work feelings into clear data, letting you see exactly how many focused minutes you’ve earned each day.
When you consistently track productive hours with a timer, patterns emerge that let students, remote workers, freelancers, and busy professionals tweak schedules, boost focus, and celebrate real wins.
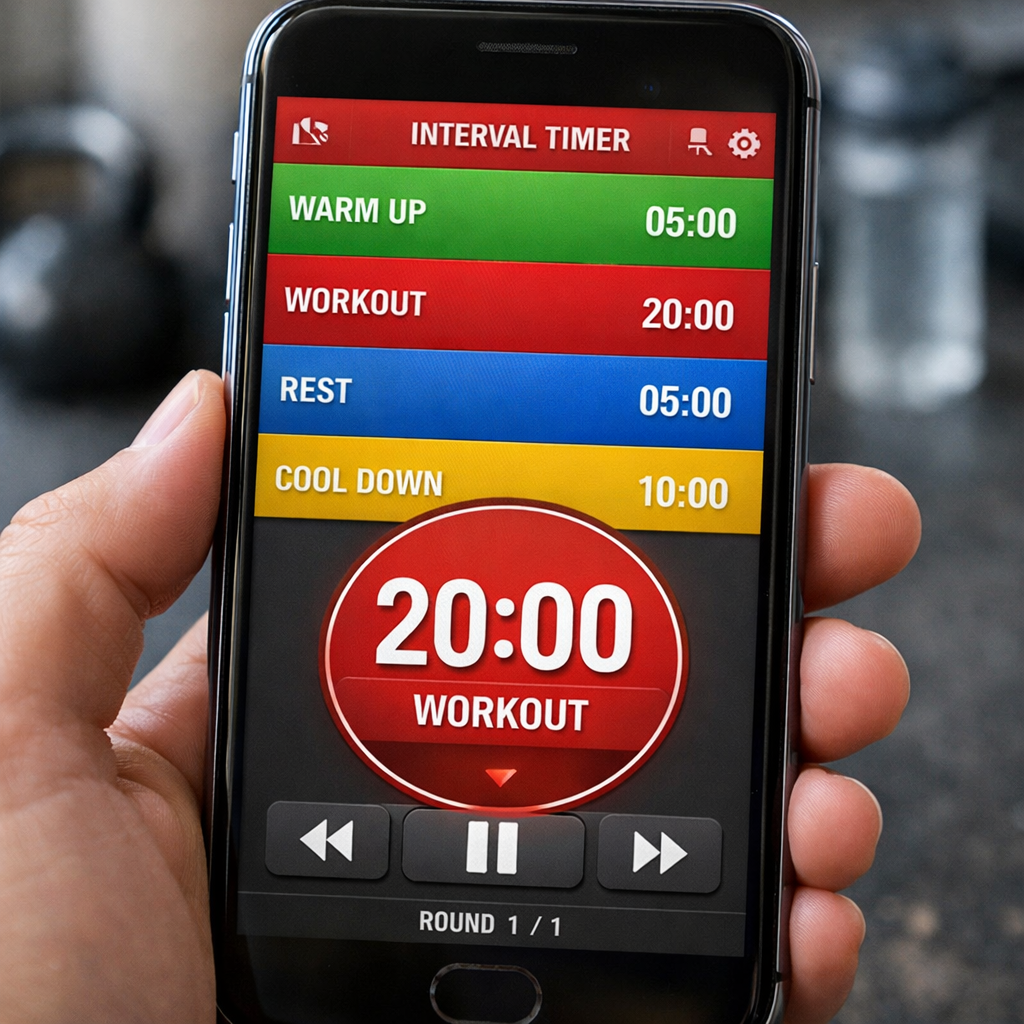
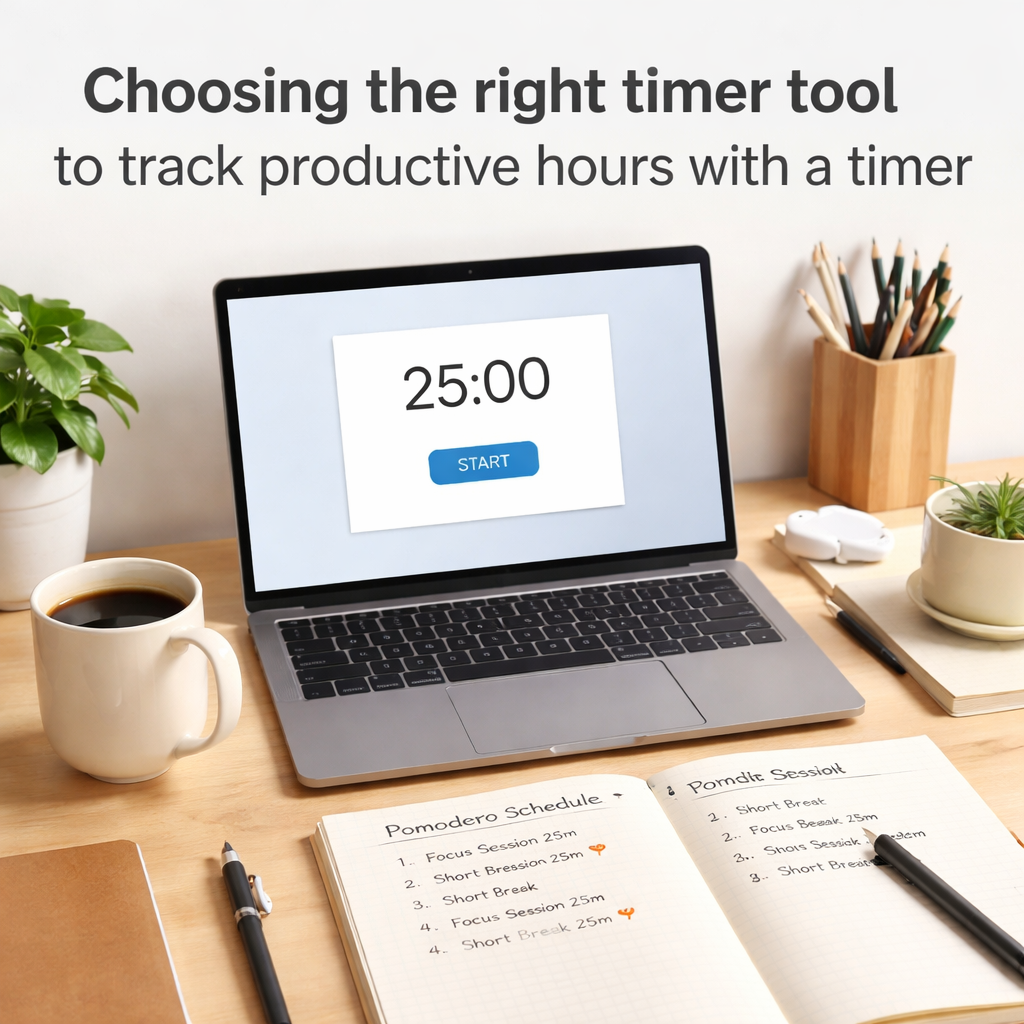
Step 1: Choose the Right Timer Tool
Alright, before you can start tracking productive hours with a timer, you need a tool that feels like a natural extension of your workflow. It shouldn’t be a clunky gadget you fight with; it should sit in the background, nudging you forward.
First, ask yourself what environment you spend most of your day in. Are you a student pulling all‑nighters in the library? A remote worker juggling Zoom calls and Slack messages? A freelancer hopping between client briefs? Or a busy professional with back‑to‑back meetings? Your answer will steer you toward the right kind of timer – a simple phone alarm, a dedicated Pomodoro app, or a desktop widget that syncs across devices.
For most people, a Pomodoro‑style app is the sweet spot. It breaks work into bite‑size intervals, gives you a clear start‑stop cue, and builds that dopamine‑boosting habit loop we love. If you’re not sure where to start, check out What is time tracker with pomodoro? – it walks you through the basics without the tech jargon.
Now, let’s talk specifics. If you prefer something you can see on your desk, a desktop timer like the one built into Focus Keeper offers a bright visual countdown and optional sound cues. If you’re always on the go, a mobile app that runs in the background (so you don’t have to keep opening it) might be better. And if you love a tactile feel, a good old‑fashioned kitchen timer still does the trick – just set it, walk away, and let the ticking do the reminding.
One thing many overlook is integration with other tools you already use. Does the timer export data to a spreadsheet? Can it tag tasks automatically? Those little features become huge time‑savers when you’re reviewing your weekly audit. A timer that talks to your calendar can even block off focus blocks for you, turning intention into scheduled reality.
So, which tool feels right? Try a couple for a week each. Record how often you actually start the timer, how often you get distracted, and which interface feels least frictiony. The one that yields the highest “on‑timer” percentage is likely your best fit.
While you’re picking a timer, consider supporting your focus with a little extra brain fuel. Great Bite Supplements offers nootropic gummies that many users say help sustain mental clarity during those intense work sprints.
And don’t forget the bigger picture of wellbeing. A proactive health coach can help you manage stress, sleep, and nutrition – all of which feed directly into how sharp you feel when the timer starts. XLR8well provides exactly that kind of wellness coaching, making your focus sessions more effective.
Here’s a quick visual recap of what to look for:
- Platform: desktop, mobile, or physical.
- Pomodoro support: 25‑minute work/5‑minute break cycles.
- Data export: CSV, spreadsheet, or dashboard.
- Integration: calendar, task manager, or habit tracker.
Once you’ve settled on a tool, you’re ready for the next step: setting clear intentions before you hit start.
Take a moment to visualize your ideal work block – a quiet desk, a timer humming softly, and a clear goal in mind. That mental picture, paired with the right timer, turns abstract “busy‑work” feelings into concrete, trackable minutes.
Step 2: Set Up Your Productivity Categories
Okay, you’ve got a timer humming and a notebook ready. The next piece of the puzzle is giving that time some meaning – that’s where productivity categories come in. Think of categories as little folders for your focus, so when you glance at your log you instantly know what you were actually doing.
Does it feel a bit fuzzy right now? Don’t worry, you’re not alone. Most people start with a single “work” bucket and quickly get lost in a sea of vague entries. Let’s turn that into something crystal clear.
Why Categories Matter
When you track productive hours with a timer, the raw minutes are useful, but the context is what drives insight. By labeling each block – say, “Research,” “Writing,” or “Client Calls” – you can spot patterns, spot bottlenecks, and celebrate the real wins.
Picture this: after a week of logging, you notice that “Email triage” eats up 30% of your time, while “Deep work” only shows up 15% of the minutes. That’s a conversation starter with yourself, and a chance to tweak your schedule.
Step‑by‑Step: Building Your Category System
1. Brainstorm the major activities you do in a typical day. For students, it might be “Reading,” “Problem Solving,” “Note Review.” Remote workers often use “Meetings,” “Coding,” “Project Planning.” Freelancers love “Client Work,” “Admin,” “Marketing.” Busy pros might add “Strategic Thinking” and “Quick Wins.”
2. Group similar tasks. If you have “Design Mockups” and “Wireframing,” they could live under a broader “Design” category. The goal is to keep the list short enough to pick quickly, but specific enough to be meaningful.
3. Assign a colour or icon. Visual cues make it easier to select the right tag on the fly. Most timer apps let you add a colour label – use a bright green for “Deep Work” and a calming blue for “Breaks.”
4. Test it for a day. Start each session by choosing a category, then note how often you have to switch or add a new one. If you’re constantly creating ad‑hoc tags, your list is probably too broad.
5. Refine weekly. At the end of each week, glance at the summary. Merge categories that rarely appear, split ones that feel too crowded, and add any new recurring activity.
In our experience, a simple three‑tier system – Core Work, Support Tasks, and Breaks – works for most people. It gives enough granularity to see where the real value is, without overwhelming you.
Here’s a quick reference table you can copy into a spreadsheet or a notes app:
| Category | Typical Example | Why It Matters |
|---|---|---|
| Deep Work | Writing a research paper, coding a feature | Shows high‑value focus time; helps protect it from interruptions. |
| Support Tasks | Email triage, admin paperwork | Highlights low‑impact activities that can be batch‑processed. |
| Breaks & Reset | Stretch, quick walk, meditation | Ensures you’re recharging; prevents burnout. |
Now, a quick visual aid. This short video walks through how to set up categories in a typical Pomodoro‑style app. It shows the click‑through for adding colours, naming tags, and reviewing the weekly report.
Take a moment after the video to open your timer and create three starter categories. Don’t overthink it – just pick the ones that feel most natural for your day.
Once you’ve got categories in place, you’ll start to see the data speak. Maybe you’ll discover that “Deep Work” blocks are most productive in the morning, or that “Support Tasks” spike after a long meeting. Those insights let you schedule smarter, not harder.
And remember, the system is yours. If you’re a student prepping for finals, you might add “Practice Problems” as its own bucket. If you’re a freelancer juggling several clients, you could tag each client separately under the “Client Work” umbrella. The flexibility is the secret sauce.
Bottom line: categories turn raw minutes into a story you can act on. They help you track productive hours with a timer in a way that’s clear, actionable, and motivating. So go ahead – set up those categories, hit start, and watch the patterns emerge.
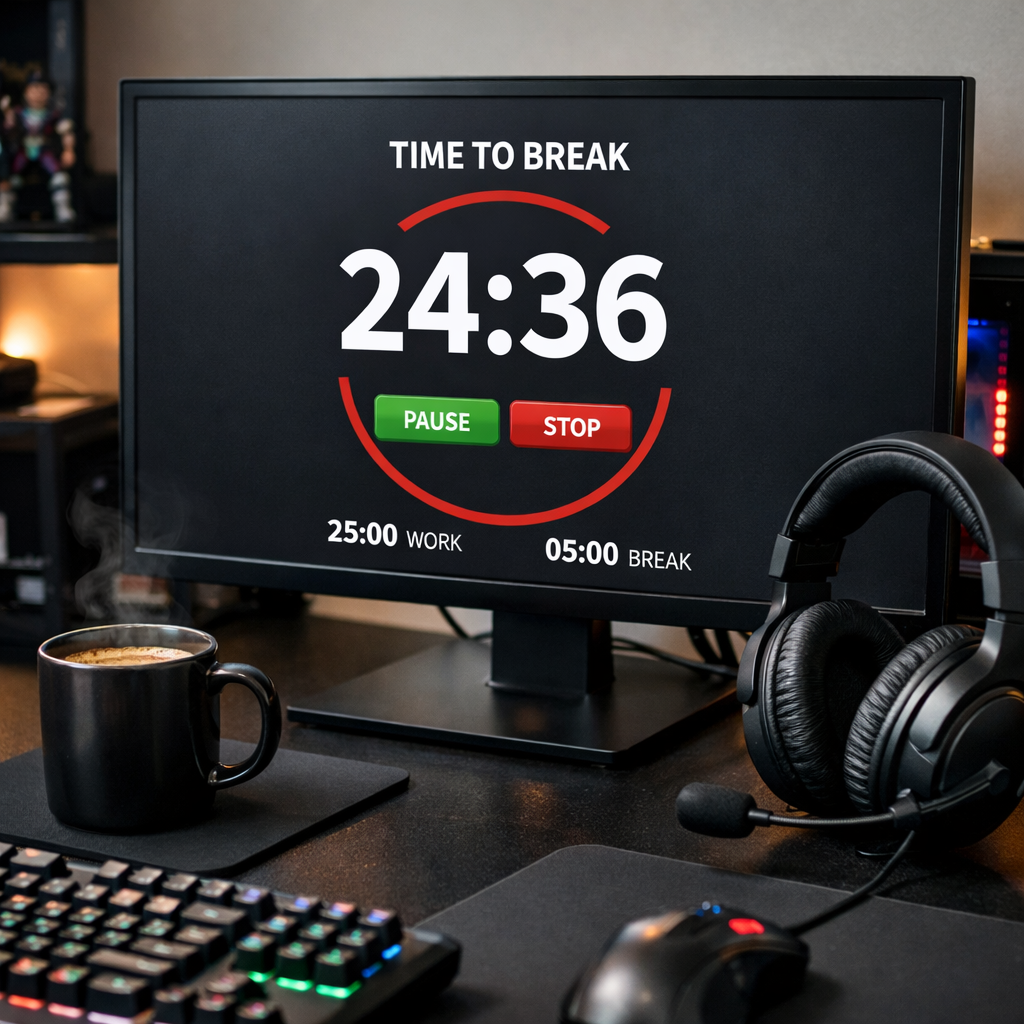
Step 3: Configure Pomodoro Intervals and Breaks
Alright, you’ve got your categories in place – now it’s time to tell the timer how long you actually want to work and rest.
The classic Pomodoro rhythm of 25 minutes work / 5 minutes break works for many, but the goal isn’t to force a one‑size‑fits‑all schedule. It’s to set intervals that let you track productive hours with a timer without feeling like you’re watching a metronome.
Pick the right work‑block length
Start by asking yourself: when do you feel most “in the zone”? Students often hit a flow state after a short warm‑up, so a 20‑ to 30‑minute block feels natural. Remote workers juggling meetings might need a longer 45‑minute slot to get past the “getting‑started” hump. Freelancers juggling multiple clients sometimes split the day into 35‑minute bursts, giving each project a dedicated window.
If you’re not sure, try the default 25 minutes for a day. Notice whether you finish a task comfortably or if you’re left hanging. If you’re consistently cutting yourself off, bump it up by five minutes. If you’re constantly checking the clock, shave it down.
Set your break rhythm
Breaks are where the brain refuels. A short 5‑minute micro‑break after each work block is enough to stretch, sip water, or glance at a to‑do list. After four cycles, give yourself a longer 15‑ to 30‑minute pause – that’s the “big break” that lets you reset.
Tailor the length to what you’re doing. Creative freelancers often benefit from a 10‑minute walk to let ideas percolate. Busy professionals may prefer a quick meditation or a glance at their calendar to prep for the next meeting. The key is to keep the break purposeful but brief – you don’t want the break to become a new distraction.
Fine‑tune for your role
Here’s how a few of our users tweak the defaults:
- Students: 25 min study / 5 min stretch, then a 20‑minute “deep‑review” session after the third Pomodoro.
- Remote workers: 45 min focused coding / 10 min eye‑rest, followed by a 30‑minute lunch‑break after three cycles.
- Freelancers: 35 min client work / 7 min admin catch‑up, with a 25‑minute “biz‑admin” block at midday.
- Busy professionals: 50 min project planning / 5 min quick‑email sweep, then a 20‑minute power‑walk before the next meeting.
Notice the pattern: each tweak aligns the interval length with the natural ebb and flow of the task. When you match the timer to your work rhythm, the data you collect becomes far more meaningful – you’ll actually see where the high‑impact minutes live.
Quick checklist before you start
- Decide on a base work interval (20‑50 min) that feels comfortable.
- Set a short break (3‑10 min) after every work interval.
- Plan a longer break (15‑30 min) after 4‑5 cycles.
- Test for one day, then adjust the minutes up or down based on how you finish tasks.
- Write the chosen interval lengths in your timer app – Focus Keeper lets you customize both work and break lengths in seconds.
Once your intervals are locked in, hit start and let the timer do the heavy lifting. Each beep signals a shift, each pause gives you a moment to note what you accomplished. Over a week you’ll have a clear picture of how many productive minutes you actually logged, and you’ll see exactly where you can tighten or relax your schedule.
Remember, the whole point isn’t to obey a rigid formula – it’s to give yourself a reliable framework that makes it easy to track productive hours with a timer and, more importantly, to act on that data. Tweak, observe, and repeat. Your future self will thank you for the extra focus and the fewer wasted minutes.
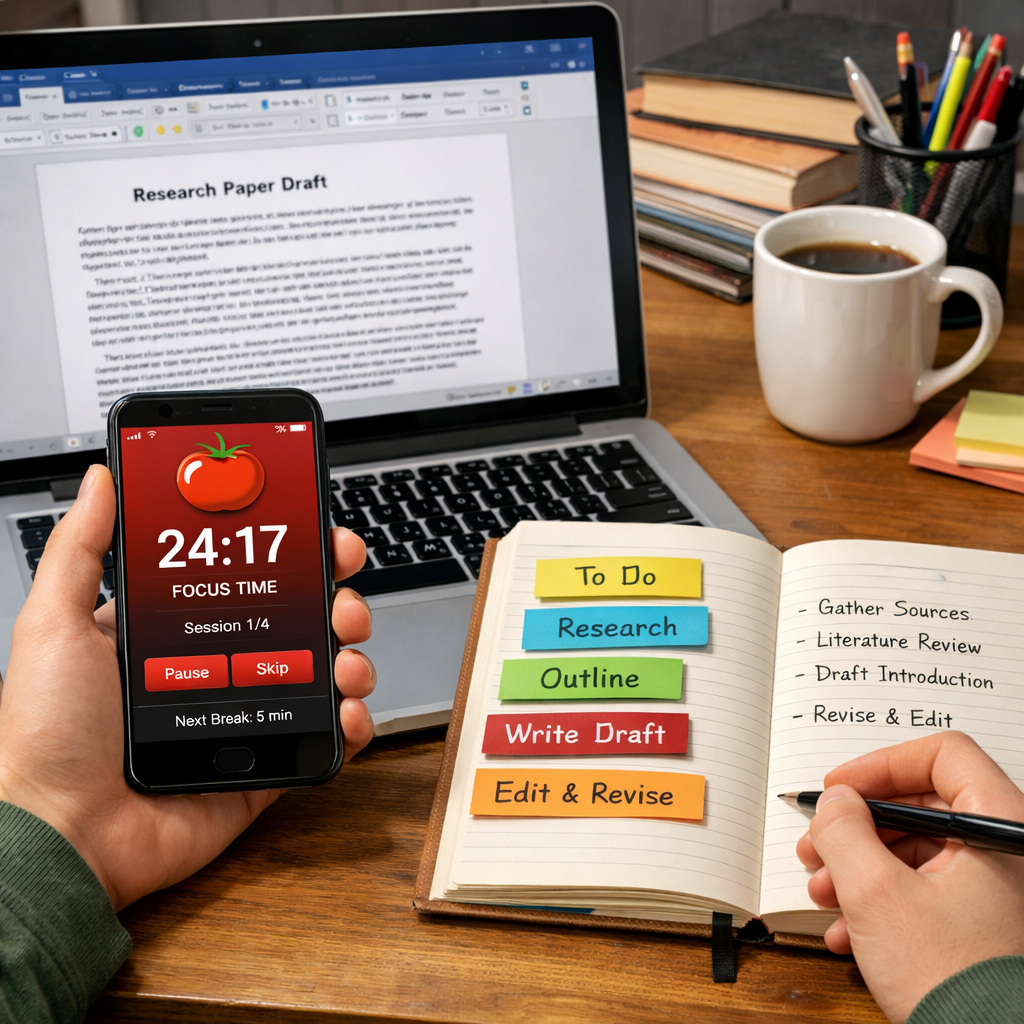
Step 4: Log Hours Daily
Now that you’ve set your intervals and categories, the real magic happens when you actually write down what you’ve done each day. Think of your log as a tiny diary that tells you, “Hey, you spent three hours on deep work and only forty‑five minutes on email.” That snapshot is what lets you truly track productive hours with a timer.
First thing’s first: grab a place to record. It can be a simple Google Sheet, a paper notebook, or the notes section of your timer app. The tool doesn’t matter as much as the habit of opening it the moment the timer dings.
Step‑by‑step logging routine
1. Stop, breathe, and note the task. When the beep sounds, pause for five seconds. Jot down the category you chose (e.g., Deep Work, Support Tasks) and a one‑line description of the actual work – “drafted introduction for research paper” or “reviewed client brief.”
2. Capture the minutes. Most timer apps show the exact block length. Write that number next to your description. If you ran a 35‑minute session, record “35 min.”
3. Flag the quality. Add a quick emoji or rating (⭐️‑3, ⚡️‑2) to remind yourself how focused you felt. Over weeks you’ll see patterns – maybe you’re sharpest in the morning or after a short walk.
4. Summarize at day‑end. At the end of each workday, total the minutes per category. A quick formula in a spreadsheet does the heavy lifting: =SUMIF(CategoryRange, “Deep Work”, MinutesRange). You’ll instantly see how many productive hours you actually logged.
Does that sound like a lot of extra work? Not really. The whole process takes less than a minute per session, and the payoff shows up in the data you get back.
Real‑world examples
Imagine Maya, a senior engineering student, who logs every Pomodoro in a notebook. After a week she notices she consistently logs 120 minutes of “Problem Solving” between 9 am and 11 am, but only 30 minutes in the late afternoon. She shifts her toughest assignments to the morning slot and watches her grades climb.
Now picture Carlos, a freelance web designer juggling three clients. He tags each block with the client name. At month’s end his log reveals Client A consumes 45 % of his billable minutes, while Client C only 15 %. He renegotiates rates with Client C and rebalances his schedule, ending up with a healthier income stream.
Then there’s Laura, a remote project manager who tracks “Meeting Prep” and “Meeting Execution” separately. She discovers that prep time is double the execution time, a clear sign she’s over‑preparing. She trims prep blocks by ten minutes, freeing up extra focus time for strategic planning.
These snapshots aren’t magic; they’re the result of a disciplined log that turns raw minutes into actionable insight.
Tips to make logging painless
• Pre‑fill categories. Keep a dropdown list ready so you don’t have to type the same word over and over.
• Use shortcuts. On a phone, set a quick‑text snippet like “DW – research intro – 25 min – ⭐️” and paste it after each beep.
• Batch review. Reserve a 10‑minute slot on Friday afternoon to glance at the week’s totals. That’s the moment you decide what to tweak next.
• Celebrate tiny wins. If you hit a target of 20 productive hours for the week, give yourself a non‑work reward – a favorite podcast episode or a short walk.
• Stay flexible. If a session gets interrupted, note the reason (“phone call”) and move the remaining minutes to a new block later. The log still reflects reality.
Finally, remember the purpose behind the numbers. The log isn’t a punishment; it’s a mirror that shows you where your focus lives and where it leaks. When you can see the data, you can make small, confident adjustments instead of vague guesses.
So, grab that timer, set your interval, and start logging each beep. In a few days you’ll have a clear picture of how many productive hours you actually earn, and you’ll be ready to fine‑tune your schedule for even better results.
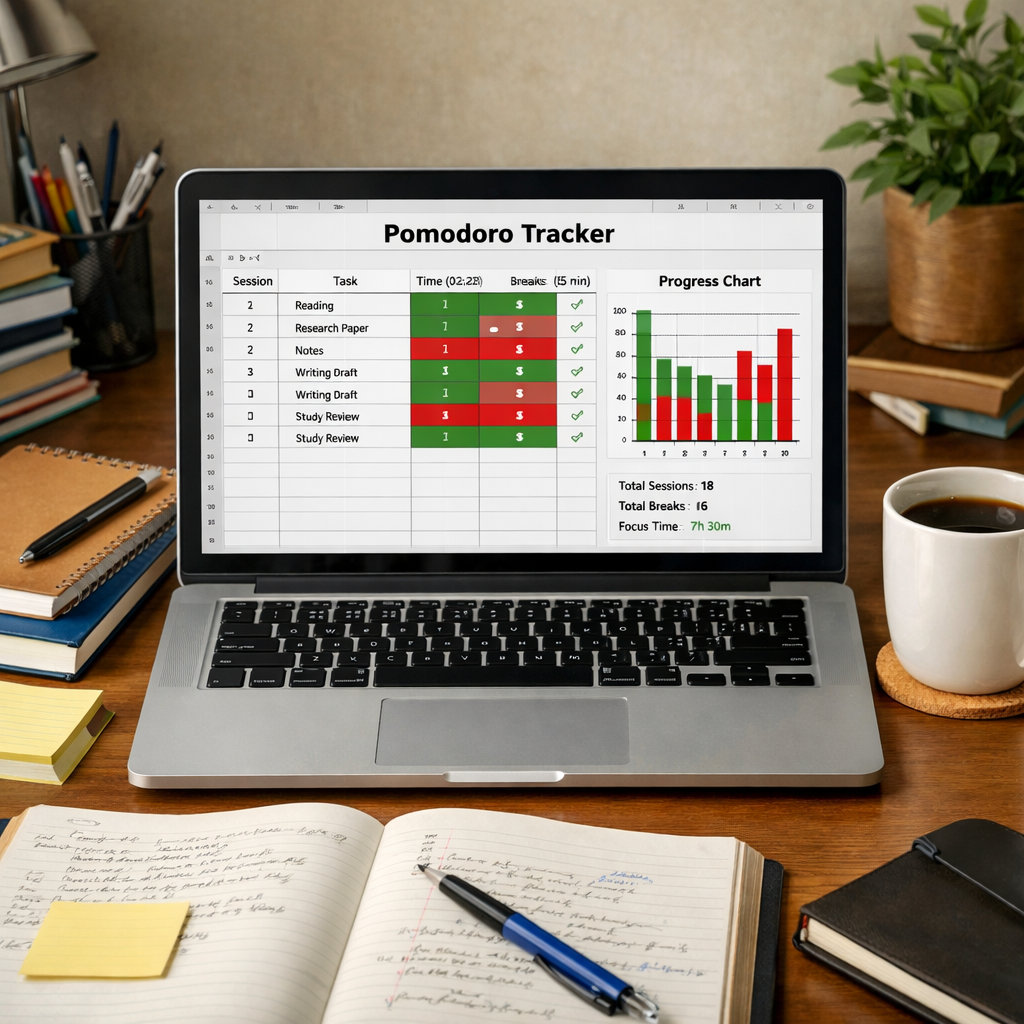
Step 5: Analyze Data and Adjust Workflow
Now that you’ve been logging each beep, the real magic happens when you step back and actually read the numbers. It’s one thing to see “25 min” pop up after every session; it’s another to notice that those 25‑minute blocks are clustering in the morning while afternoons are a blur of short interruptions. That pattern is your first clue about where to tweak.
Pull the raw data together
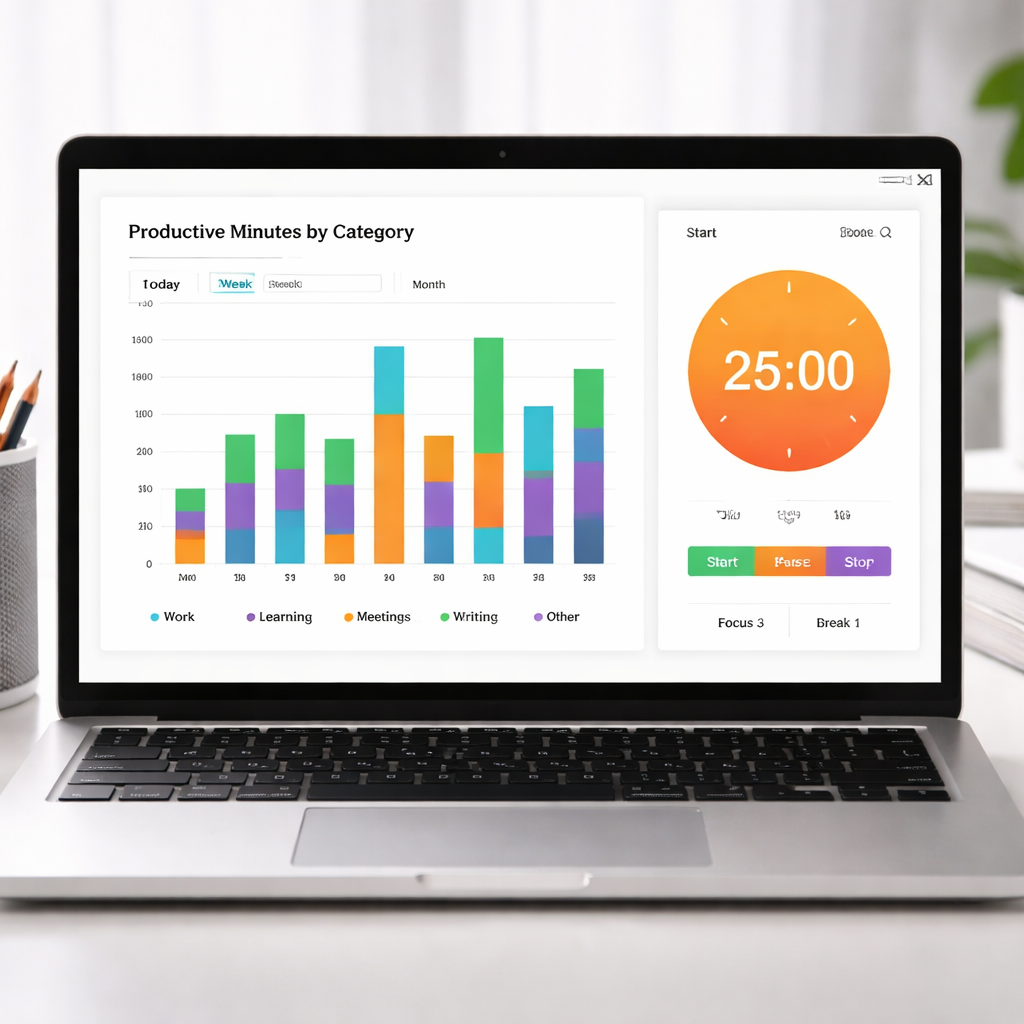
Open the spreadsheet or the notes app you’ve been feeding. If you’re using a Pomodoro‑style timer like Focus Keeper, you can export the session log as a CSV and drop it into a simple table. Look for three columns: date, category, minutes.
Quick tip: add a fourth column called “Focus Rating” – a 1‑5 emoji you already scribbled. It’ll let you match minutes with how sharp you felt.
Spot the trends
Ask yourself a few questions while you scan the rows:
- Which category consistently rakes in the most minutes?
- Do the highest‑rated sessions line up with a particular time of day?
- Are there days where total minutes dip below your weekly target?
For a student, you might see “Deep Work” spikes between 9 am‑11 am and drops after lunch. A freelancer could notice that “Client A” sessions are always 45 min, while “Admin” tasks creep into 15‑minute fragments.
Turn numbers into tiny experiments
Pick one insight and turn it into a test. If your data shows you’re most focused at 10 am, block that hour for your toughest task and schedule low‑energy chores for the late afternoon. If “Breaks & Reset” minutes are too short, extend the micro‑break to 7 minutes and watch the next work block’s focus rating.
Write the hypothesis in a single sentence, like “Adding a 10‑minute walk at 2 pm will boost my focus rating by at least one point for the 3 pm session.” Then run it for a week and compare the before‑and‑after rows.
Use visual dashboards
Even a basic bar chart can make the story pop. Plot total minutes per category on the y‑axis and days of the week on the x‑axis. Color‑code the bars by focus rating – green for high, amber for medium, red for low. The visual cue instantly tells you, “Hey, Wednesdays are a slump, maybe I’m overloaded with meetings.”
If your timer app offers a dashboard, let it do the heavy lifting. Otherwise, a free spreadsheet add‑on will do the trick.
Adjust your workflow, then lock it in
Based on what you’ve learned, tweak one element at a time. Change the length of a Pomodoro interval, shuffle categories, or shift a recurring meeting. Record the change in the same log so you can compare apples‑to‑apples.
Remember the principle of incremental change: a 5‑minute tweak is easier to stick with than a wholesale overhaul. After a couple of weeks, you’ll see a steady climb in both total productive minutes and your focus rating.
And don’t forget to celebrate the small wins. Hitting a new personal best for “Deep Work” minutes? Treat yourself to a favorite podcast episode. Those mini‑rewards reinforce the habit loop.
In our experience, the moment you let the data speak for you, the “guesswork” part of productivity disappears. You become the person who knows exactly when to push, when to pause, and how to fine‑tune the rhythm of the day. Keep the cycle going: log, analyze, adjust, repeat – and watch your ability to track productive hours with a timer turn into a reliable, growing edge.
Bonus Tips: Automate Time Tracking with Integrations
So you’ve got your timer humming, your categories set, and you’re already logging minutes by hand. What if you could let the tech do the heavy lifting, so you spend less time typing and more time actually working?
Why automate?
When you manually copy each Pomodoro into a spreadsheet, you’re adding friction. That extra step can feel like a tiny excuse for procrastination. Automation removes the “and then I’ll log it later” mindset and gives you a clean, real‑time view of how you track productive hours with a timer.
Imagine a freelancer who toggles between three client projects. One missed entry can throw off billing by an hour. An automatic tracker catches every session the moment it ends, so the data stays trustworthy.
Pick integration‑friendly tools
Not all timer apps play nicely with other software. Look for platforms that expose a webhook or an API – that’s the shortcut that lets you push data into Google Sheets, Notion, or your favorite project board without lifting a finger.
In our experience, Focus Keeper offers a simple “export to CSV” feature and can send completed session data to Google Drive via Zapier. If you’re already using Zapier or Make, you’ve got a ready‑made bridge.
Does your current timer lack integrations? That’s a sign it might be time for a switch. The market is full of options that sync straight to Outlook Calendar, Trello, or Asana – just pick the one that matches the tools you already love.
Set up automatic logging
Step one: create a Zap that watches for a new “timer completed” event. Step two: map the fields – date, start time, duration, and the category you chose – into a new row in a Google Sheet. Step three: let the Zap run in the background.
It only takes a few minutes the first time, and once it’s live you’ll see a fresh line appear every time the timer dings. No copy‑paste, no missed minutes.
Pro tip: add a column for “Focus Rating” and set the Zap to default it to a neutral emoji. You can update it later with a quick tap in the sheet – still far less effort than writing a note after every session.
Connect calendar and project apps
If you schedule work blocks in Google Calendar, you can have the timer pull the event title automatically. That way the logged category matches the meeting or task without you thinking about it.
For freelancers, linking the timer to a project management board (like Trello) means each card can receive its own time total. At the end of the week you’ll see exactly how many minutes you spent on “Client A – Wireframes” versus “Admin – Invoicing”.
Remote workers love syncing with Outlook because the workday is already laid out there. When a Pomodoro finishes, the Zap adds the minutes to a “Focus” calendar overlay, giving you a visual heat map of concentration across the week.
Test, tweak, and trust the data
After you’ve built the first integration, run it for three days. Check the sheet for duplicate rows or missing fields – those are the hiccups you’ll want to iron out.
Then, compare the automatically captured minutes to your manual log (if you kept one). If the numbers line up, you’ve earned a reliable data source you can actually trust.
From there, treat the sheet like a dashboard. Spot a dip on Wednesday afternoon? Maybe that’s when your meetings pile up, so move a deep‑work block to Thursday morning. Small adjustments become obvious when the numbers are already there.
Bonus: combine with focus‑boosting habits
Automation isn’t a magic wand that solves everything. Pair it with the habits we’ve already covered – clear intentions before each session, short micro‑breaks, and a quick “what did I accomplish?” note. The automation handles the boring part, you handle the thinking part.
Give it a try this week: set up a Zap that logs your Focus Keeper sessions to a Google Sheet, watch the rows appear, and then spend five minutes on Friday reviewing the pattern. You’ll be amazed at how much clearer the picture becomes, and you’ll finally have the data to prove exactly how many productive hours you really earn.
Conclusion
So you’ve set up categories, fine‑tuned your Pomodoro intervals, and even automated the logging. If you’re still wondering whether all this effort matters, think about the last time you stared at a blank spreadsheet and felt clueless about where your day went.
When you can actually track productive hours with a timer, those vague frustrations disappear. You see, the data becomes a conversation starter with yourself – “I’m crushing deep work in the mornings, but the afternoons are all email fluff.” That insight alone is worth the few minutes you spend noting each beep.
What’s the next step? Grab your timer, run a quick Friday review, and pick one tiny tweak – maybe shift a client call to a low‑energy slot or extend a micro‑break by two minutes. Implement it next week and watch the numbers shift.
In our experience, students who schedule their toughest study block right after a short walk see a 10‑15% boost in retained material, and freelancers who batch admin after a focused session report smoother billing cycles. Those are real‑world payoffs of a simple habit.
Remember, the goal isn’t perfection; it’s a clearer picture of how you actually spend time. Keep logging, keep adjusting, and let the rhythm you create guide the rest of your workday.
Ready to turn those rows into results? Give your timer a purpose today and let the data do the heavy lifting.
FAQ
How do I start tracking productive hours with a timer if I’ve never used one before?
First, grab any simple timer – even the built‑in clock on your phone works. Set a short interval that feels comfortable, like 20 minutes, and hit start. When the beep rings, pause a breath, note the task you just finished, and write down the minutes. It’s okay to start with just one or two sessions a day; the habit builds faster than the perfect system.
What’s the best way to set up categories so my data is actually useful?
Think of categories as the labels on a filing cabinet. Keep them broad enough to choose in a second – for example, “Deep Work,” “Admin,” “Learning,” and “Breaks.” If you’re a freelancer, add a client tag underneath “Deep Work.” After a week, glance at the totals; if a category never shows up, merge it. The goal is a quick‑click list that still tells a story.
How often should I review my timer data to make real improvements?
We recommend a quick Friday‑afternoon sweep. Open your log, total minutes per category, and note any spikes or dips. Ask yourself: “Did I feel sharper in the morning?” or “Why did admin balloon on Wednesday?” Jot down one tiny tweak for the coming week – maybe shift a meeting or extend a micro‑break. A weekly habit keeps the data fresh without overwhelming you.
Can I use a timer for both work and study without it feeling rigid?
Absolutely. Treat the timer as a gentle nudge, not a prison guard. For study sessions, pair a 25‑minute block with a short stretch; for work, you might run a 45‑minute sprint followed by a 5‑minute reset. The key is to match the interval length to the activity’s natural flow. If you notice the timer’s beep pulling you out of focus, simply adjust the minutes – flexibility wins.
What’s a simple habit to keep logging consistent even on busy days?
Keep a pre‑filled template on your desk or phone. A one‑line format like “Category – Task – Minutes – ⭐️” can be pasted with a tap. When the timer dings, copy‑paste the line and fill the blanks in under ten seconds. Because the action takes almost no effort, you won’t skip it even when your calendar is packed.
How do I avoid the timer becoming a distraction itself?
Choose a timer with a subtle sound or vibration – loud alarms scream for attention. Turn off pop‑up notifications that compete with your work apps. If you find yourself checking the clock too often, hide the display after you start; trust the beep to tell you when the block ends. The timer should signal transitions, not dominate the conversation.
Is there a quick way to visualize my productive hours without fancy software?
Yes – a simple bar chart in Google Sheets does the trick. Export your CSV or copy‑paste the date, category, and minutes columns, then select Insert → Chart. Choose “Stacked bar” and colour‑code each category. Within minutes you’ll see at a glance which days are heavy on deep work versus admin, giving you a visual cue for the next tweak.