Ever opened a blank notebook and felt the pressure of figuring out how to actually get things done?
You’re not alone. Most of us start the day with a mountain of tasks, but without a clear roadmap, even the best intentions dissolve into scroll‑throughs and distractions.
That’s where a productivity planner template steps in. Think of it as a lightweight skeleton you can flesh out with your own priorities, deadlines, and Pomodoro bursts—so the plan does the heavy lifting, not your brain.
In our experience at Focus Keeper, students juggling lectures, remote workers balancing meetings across time zones, freelancers juggling multiple client projects, and busy professionals all crave a single place that translates chaos into bite‑size actions.
Imagine you’re a university sophomore staring at a looming essay, a design sprint deadline, or a stack of invoices. With a template that breaks the day into focused intervals, you can slot a 25‑minute Pomodoro into each task block, track progress, and see exactly where your time disappears.
But why a template instead of just a to‑do list? A plain list tells you what to do, but a planner shows you when to do it, how long you’ll spend, and when to recharge. The visual layout nudges you to respect breaks, preventing burnout before it even starts.
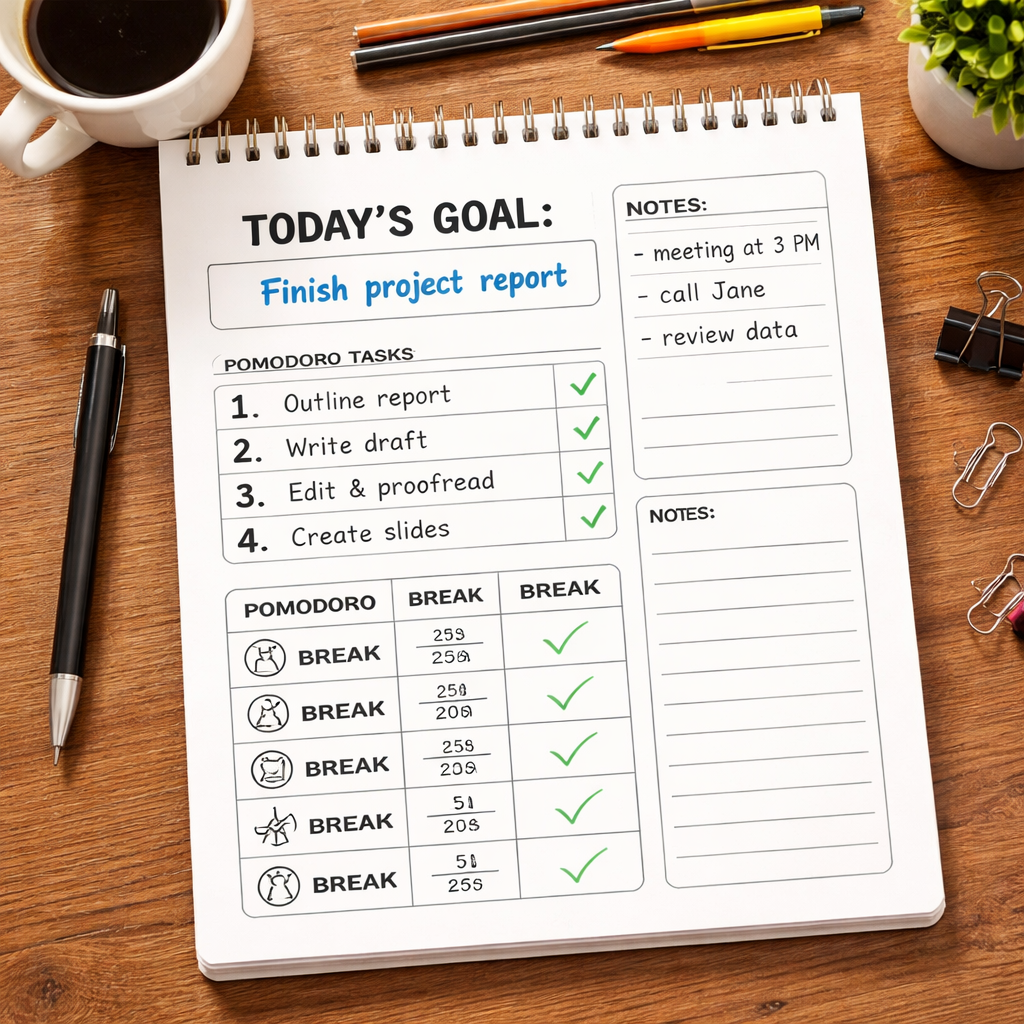
So, what should you look for in your first productivity planner template? Start with sections for daily goals, time‑boxed tasks, and a quick reflection space. Add a column for Pomodoro counts if you love the technique, and leave a margin for notes or unexpected interruptions.
Feeling overwhelmed about setting it up? Don’t worry—building a template is a one‑time experiment. Grab a printable, sketch a few rows, try it for a week, and tweak the layout until it feels like an extension of your own workflow.
Ready to turn that blank page into a roadmap that actually moves you forward? Let’s dive in and explore the essential elements you need to create a productivity planner template that works for you.
TL;DR
A productivity planner template turns a chaotic to‑do list into a visual roadmap, letting you slot Pomodoro bursts, track progress, and schedule breaks so you actually finish work without burning out. Grab a printable, sketch your own layout, test it for a week, then tweak until it feels like an extension of your brain, whether you’re a student, remote worker, freelancer, or busy professional.
Step 1: Define Your Productivity Goals
Before you even open a blank page, ask yourself what you truly need to move forward today. Are you trying to finish a research paper, ship a client deliverable, or finally clear out that mountain of unanswered emails? Pinpointing the core outcome turns a vague to‑do list into a real target you can chase.
One trick we love at Focus Keeper is to phrase the goal as a concrete, measurable statement. Instead of “study biology,” try “complete 3 Pomodoro cycles on Chapter 5 and write a 250‑word summary.” Instead of “work on the project,” say “draft the project brief, get two stakeholder approvals, and schedule the next sprint planning meeting.” The more specific, the easier it is to slot into a productivity planner template.
Now, break that big goal into micro‑milestones that fit into 25‑minute intervals. Write each micro‑milestone on its own line in the template, leaving a tiny checkbox next to it. When the timer dings, you’ve got a visual cue that says, “Great, that piece is done—move on to the next one.” It feels like a small win every quarter hour, and those wins add up fast.
But how do you decide which milestones belong in the same day and which can wait? Ask yourself three quick questions: Is the task time‑bound? Does it depend on something else finishing first? Will skipping it today cause a bottleneck tomorrow? If you answer yes to any, give it priority in your daily layout.
Here’s a simple checklist you can copy into your planner template:
- State the main goal in one sentence.
- List 3–5 micro‑tasks that directly support that goal.
- Assign an estimated Pomodoro count to each micro‑task.
- Mark any tasks that need a break before the next focus block.
Take a moment to visualize how those blocks will look on paper. Picture a column titled “Today’s Goal,” a row for each Pomodoro slot, and a tiny margin for notes or unexpected interruptions. When the layout feels natural, you’ve just defined a goal‑driven structure that your brain can follow without second‑guessing.
So, what should you do next? Grab a pen, write down the single most important outcome you want by the end of the day, and then break it into bite‑size actions that fit inside your productivity planner template. If you’re a student, maybe it’s “solve 10 calculus problems”; if you’re a freelancer, perhaps “send invoices to three clients and outline next week’s proposal.” The key is clarity, not perfection.
And remember, goals aren’t set in stone. As you work through your Pomodoros, you might discover a task takes longer or a new priority pops up. That’s where the reflection space in the template shines—just jot a quick note and adjust tomorrow’s plan.
Feeling stuck? Try this quick mental reset: close your eyes, imagine the feeling of crossing the finish line on that goal, then open your planner and write the first micro‑task that will get you there. The mental image often fuels the first action.
After watching the short video, you’ll see a live example of how a single goal can be mapped onto a printable productivity planner template. Notice how the creator groups related Pomodoros together and leaves space for a quick end‑of‑day reflection.

Finally, give yourself a tiny deadline to test the goal definition. Set a timer for 15 minutes, fill out the goal section of your template, and then jump straight into the first Pomodoro. The momentum you create in those first minutes often carries you through the rest of the day.
Defining clear, actionable productivity goals is the foundation of any effective planner. Once you’ve nailed this step, the rest of the template—time‑boxing, break scheduling, and reflection—will fall into place like pieces of a puzzle you’ve already started solving.
Step 2: Choose the Right Layout and Sections
Okay, you’ve already nailed down what you actually want to achieve. Now comes the fun part – deciding how your productivity planner template will look on the page. It sounds simple, but the layout you pick determines whether you’ll actually use the planner or let it collect dust.
Start with a layout that matches your rhythm
If you thrive on minute‑by‑minute timing, an hourly layout is a lifesaver. You get a column for every half‑hour, so you can slot a Pomodoro straight into the slot that matches your calendar.
Prefer to see the whole week at a glance? A weekly spread gives you enough room to note daily goals, Pomodoro blocks, and a quick reflection box without overwhelming you.
Or maybe you’re a big‑picture thinker who only needs to map out milestones. In that case, a monthly view works wonders – you can drop in key deliverables and let the weekly or daily pages handle the detail.
Does any of that feel right? If you’re still on the fence, try a hybrid: a monthly calendar on the left page, a weekly or daily grid on the right. Flip back and forth and see which combo feels most natural.
Break your planner into purposeful sections
Once you’ve chosen a base layout, think about the sections that will keep your day flowing. Here are the most useful ones, based on how real planners get built:
- Inbox/Brain‑Dump – a catch‑all spot for anything that pops into your head. It prevents mental clutter and gives you a place to sort ideas later.
- Projects – a dedicated column or page for any task that needs more than two steps. Break each project into bite‑size actions you can slot into Pomodoros.
- Daily Agenda – your go‑to place for appointments, deadlines, and the Pomodoro count you’ve allocated.
- Currently – a short‑term “what’s on my desk now” list that helps you stay focused on the task at hand.
- Notes & Reference – quick reference sheets (e.g., keyboard shortcuts, study formulas, client specs) so you don’t have to rewrite them.
PlanWithBee breaks down these sections nicely, and you can borrow the terminology that resonates most with you here. The key is to keep each section lean – too many boxes and you’ll spend more time navigating than doing.
Tailor sections to your audience
Students often need a “Class Schedule” and “Assignment Tracker” built right into the template. Remote workers love a “Time‑Zone Sync” column so they can see overlapping hours with teammates. Freelancers benefit from a “Client Invoice” mini‑section that reminds them to log billable hours after each Pomodoro. Busy professionals might add a “Meeting Outcomes” box to capture decisions without flipping to a separate notebook.
Pick the sections that solve the biggest friction points for your day. If you’re constantly forgetting to log your Pomodoro counts, add a tiny “Pomodoro Counter” column next to each task.
Test, tweak, repeat
Grab a printable version of your draft layout, or sketch it in a notebook. Use it for one full workday. Ask yourself:
- Did I spend more time looking for a space than actually working?
- Was there a section that stayed empty?
- Did any part feel cramped?
Then adjust. Maybe the hourly slots need a 15‑minute buffer, or the “Projects” column needs a sub‑list for next‑actions. The beauty of a template is that it’s a living document – treat it like a prototype you iterate on.
Pro tip: keep a sticky‑note on the inside cover that says “Review layout every Friday.” That quick check‑in prevents the planner from becoming stale.
Make it visually inviting
Even the most functional layout can feel like a chore if it looks dull. Add a splash of colour to headings, use a simple icon for the “Inbox,” or draw a tiny coffee cup next to your favourite Pomodoro slot. These tiny visual cues signal to your brain, “Hey, this is a place you love to use.”
Remember, the goal isn’t to create a work of art – it’s to craft a tool that nudges you forward, every single day.
So, what’s your next move? Sketch a quick layout, pick two sections that matter most to you, and try it out tomorrow morning. You’ll be surprised how a thoughtful layout can turn a chaotic day into a series of focused, bite‑size wins.
Step 3: Add Time‑Blocking and Priority Grids (Video)
Alright, you’ve got your goals and a layout that feels right. Now it’s time to give your day a spine – that’s where time‑blocking and priority grids come in. Think of them as the traffic lights for your tasks: green means go, amber means plan, red means hold off.
Why time‑blocking works (and why you’ll love it)
Research shows that breaking the day into defined chunks can boost focus by up to 30 % because your brain stops hunting for the next thing to do. When you see a 9‑am‑to‑9‑30 am block labelled “Write intro for client brief,” you’re less likely to drift into email‑checking mode.
And it’s not just about focus – it’s about confidence. Each blocked slot is a tiny promise you keep to yourself, building momentum the whole day.
Step‑by‑step: building your time‑blocking grid
1. Pull up a template. If you need a quick start, grab a free time‑blocking template that offers 15‑, 30‑, or 60‑minute increments. Choose the increment that matches your typical Pomodoro rhythm.
2. Map out hard commitments first. Calendar meetings, class lectures, or client calls go in their exact slots. This prevents double‑booking and gives you a realistic “available” window.
3. Slot your priority tasks. Look at the priority grid you created in Step 2 (the Eisenhower‑style matrix). Take the top‑right quadrant (urgent + important) and drop those tasks into the biggest open blocks.
4. Add buffer zones. A 5‑minute stretch between blocks gives you time to note down thoughts, grab a drink, or simply reset. For students, a 10‑minute buffer before a lecture can be a mental warm‑up.
5. Colour‑code. Use a soft pastel for deep‑focus work, a brighter hue for creative brainstorming, and a neutral tone for admin. The visual cue tells your brain, “This is a focus zone, stay there.”
Priority grids: the quick‑scan decision matrix
While time‑blocking tells you when to work, a priority grid tells you what to work on. Create a simple 2 × 2 table: the vertical axis is Impact (Low → High) and the horizontal axis is Effort (Low → High). Plot each task.
Real‑world example: A freelance designer has three items on the list – (a) finalize a client logo (high impact, medium effort), (b) update portfolio site (medium impact, low effort), (c) research new design trends (low impact, high effort). The grid instantly shows (a) belongs in the first Pomodoro of the day, (b) can fill a short 15‑minute slot, and (c) gets pushed to a Friday afternoon when you have slack.
For remote workers juggling time zones, add a column that flags “Overlap Hours” – then you can block collaborative work only when teammates are online.
Make it stick: daily ritual
Every morning, spend five minutes reviewing the previous day’s blocks. Ask yourself: Did I finish the task I blocked? If not, why? Move the unfinished piece to the next open slot and note any blockers. This tiny reflection turns your planner into a living document.
Pro tip: Set a timer for the review – treat it like a Pomodoro. Consistency beats perfection.
Putting it all together in your productivity planner template
When you combine the time‑blocking column with a priority grid on the same page, you get a one‑stop shop. The left side shows the grid, the right side shows the day’s blocks. Drag‑and‑drop (or simply copy) tasks from the grid into the appropriate time slot.
And because we’re talking about a printable template, you can print a fresh “Priority + Time‑Block” page each week. Slip it into your planner, and you’ll see at a glance where the high‑value work lives.
Give it a try tomorrow: pick two high‑impact tasks, block them into 45‑minute windows, and watch how the rest of the day falls into place. You’ll feel the difference before your coffee even cools down.
Step 4: Incorporate Habit Trackers and Review Pages
Now that your time‑blocking and priority grid are humming, it’s time to add the glue that keeps the whole system together: habit trackers and review pages.
Ever felt a spark of motivation at the start of the week, only to see it fizzle by Thursday?
That dip usually isn’t about willpower – it’s about not having a visible cue that tells you “Hey, this habit matters right now.”
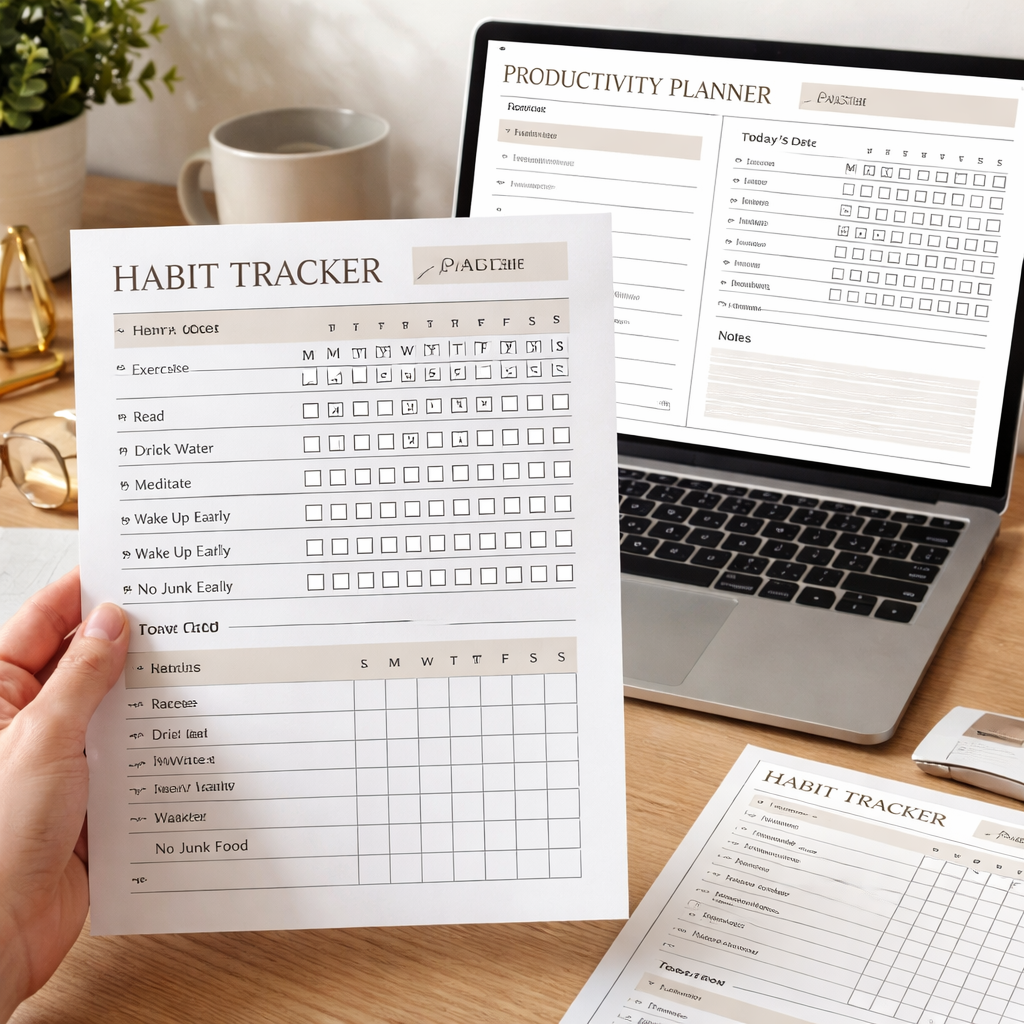
When you slip a habit tracker onto the same page as your daily agenda, the habit becomes another task you schedule, not a vague intention you hope to remember.
Why habit trackers belong in your planner
Because they give you two things you’ve been missing: a visual reminder and a built‑in accountability loop. A simple checkbox or a color‑coded streak lets you see progress at a glance, and the act of marking it down reinforces the behavior.
Pick or create a habit tracker that fits
You don’t need a fancy app to start – a printed grid works just as well. Ready‑made habit‑tracking templates on Notion let you duplicate a layout you like and drop it straight into your printable planner. That way you keep everything in one place without juggling another tool.
If you prefer a physical sheet, free printable habit tracker from Day Designer is already sized for A5 or letter‑size planners. Print it, tape it to the inside cover, and you’ve got a quick‑look reference that never gets lost in a phone drawer.
Design a review page that actually gets used
A review page is your weekly “pulse check.” It should ask just three questions: What worked? What stalled? What’s the next micro‑action?
Keep the layout tiny – a single column with a checkbox, a short sentence field, and a tiny “+1” for streaks. When you finish Friday’s review, you instantly see a visual streak that nudges you into next week’s habit loop.
- Highlight the biggest win of the week.
- Note one obstacle that kept you from a habit.
- Write a tiny tweak you’ll try next week.
Because the review sits on the same page as your habit tracker, you flip the page and complete both steps in under a minute – a habit in itself.
For students, you might track study‑session streaks, coffee‑break limits, or a quick “review flashcards” habit. Remote workers love a “stand‑up‑meeting prep” checkbox that reminds them to glance at the agenda before the video call. Freelancers can log “client‑follow‑up” and “invoice‑sent” habits to keep cash flow smooth. Busy professionals often use a simple “email‑zero” tick box to cap the inbox at the end of the day.
Here’s a quick checklist to embed habit tracking and review into your productivity planner template: 1. Choose a habit‑tracking layout (Notion template or printable). 2. Add a one‑column habit section next to your daily agenda. 3. Create a three‑question review page at the back of the week. 4. Set a recurring five‑minute Friday reminder in your planner. 5. Celebrate the streaks – even a single day counts. Follow these steps and your planner will evolve from a schedule to a habit‑building engine.
Step 5: Customize for Your Workflow (Comparison Table)
Now that you’ve got goals, layout, time‑blocking, and habit trackers in place, the real magic happens when you tailor the template to the way you actually work.
Ever feel like you’re forcing the planner to fit you instead of the other way around?
The trick is to audit your daily flow, spot the friction points, and then swap in a section or tweak a column that removes that friction.
Pick your format: printable vs digital
First, decide whether a paper‑based planner or a screen‑based one feels more natural for you. Emotivon Designs breaks down the strengths of each format, so you can match the tool to your environment.
If you love the tactile click of a pen, a printable template lets you add stickers, colour‑code with highlighters, and keep distractions at bay. If you juggle meetings across time zones, a digital version syncs across devices and lets you drag‑and‑drop tasks in seconds.
Which side of the fence are you on?
Map your core sections
Next, list the blocks that actually move the needle for your audience. Students might need a “Class‑Schedule” column, remote workers a “Timezone‑Overlap” slot, freelancers a “Invoice‑Log”, and busy pros a “Meeting‑Outcome” box.
Planify Pro’s daily‑planner cheat sheet gives a quick rundown of the most effective sections to include in any productivity planner template. Grab the ideas that resonate and drop them into your own layout.
Now, turn those ideas into a side‑by‑side comparison so you can see at a glance which version works best for each need.
Below is a concise table you can paste into your planner draft. Feel free to add rows as your workflow evolves.
| Customization Area | Printable Planner Option | Digital Planner Option | Quick Tip |
|---|---|---|---|
| Habit Tracker | Hand‑drawn grid with checkboxes | Clickable toggle in an app | Use colour‑coded stickers for printable, emojis for digital. |
| Time‑Blocking | Pre‑printed 30‑minute slots | Drag‑and‑drop blocks | Align blocks with your Pomodoro timer for seamless flow. |
| Project Overview | One‑page project list with space for notes | Expandable nested tasks | Link each project to a reference page or cloud folder. |
Study the table, then ask yourself: does the printable column give me the visual cue I need, or would the digital column’s flexibility save me clicks?
Here’s a quick checklist to make the customization stick:
- Choose the format that matches your distraction tolerance.
- Copy the three core sections from the table into your template.
- Test for one full workday; note any empty columns.
- Adjust colour, icons, or column width based on that feedback.
When the tweaks feel natural, lock the layout in and start feeding it daily data. The planner will then become a living extension of your workflow rather than a static sheet.
Give it a spin tomorrow: pick one habit, block a Pomodoro, and watch the new section guide you without a second‑guess.
Step 6: Print, Use Digitally, and Iterate
Now the template is alive on paper or screen—what’s next? The magic happens when you actually start feeding it real work and then tweak it based on what you see.
Print it, then put it where you can see it
Students, grab a fresh sheet and tape it above your desk lamp. Remote workers, print a single‑page “daily sprint” and stick it to the side of your monitor. Freelancers love a printable “client‑hour log” that sits next to their coffee mug. Busy pros often keep a compact A5 version in their planner bag.
Why does placement matter? A visible reminder triggers the brain’s habit loop: cue → action → reward. When the planner is right in front of you, you’re far less likely to skip the Pomodoro timer you set in Focus Keeper.
Use the same layout digitally
If you prefer a tablet or laptop, duplicate the printable grid in a note‑taking app or a simple spreadsheet. The key is to keep the columns identical—habit tracker on the left, time‑blocking in the centre, reflection on the right. That way you can flip between paper and screen without re‑learning the structure.
We’ve seen remote teams copy the printable into Google Sheets, then share a live link so everyone can update their blocks in real time. The result? Less “I‑forgot‑to‑log” and more accurate capacity planning.
Iterate after a trial run
Give your planner a solid test: one full workday for students, three days for remote workers, a week for freelancers, and ten days for busy professionals. Then ask yourself these quick questions:
- Did any column stay empty?
- Were the time‑blocks too tight or too loose?
- Did the habit tracker motivate you or feel like a chore?
Jot down the answers in the “Review” section of the same template. That tiny habit of reflection is the engine that turns a static sheet into a living system.
Real‑world iteration examples
Student example: Maya (a sophomore) noticed her “Study‑Session” block was always 45 minutes, but she kept running out of focus after 30. She split the block into two 25‑minute Pomodoros with a 5‑minute stretch in between. After a week, her retention scores jumped 12 % on practice quizzes.
Remote worker example: Alex works across three time zones. His printable had a single “Meeting” column, which left him double‑booking. He added a “Overlap Hours” sub‑column and colour‑coded it blue. The next sprint showed zero conflicts and a 20 % rise in on‑time deliverables.
Freelancer example: Priya tracks billable hours in a “Client‑Invoice” mini‑section. She realized she was writing the same numbers twice—once on the printable, once in her invoicing app. She merged the two by linking a QR code to her invoice spreadsheet (a quick scan saves a minute per client).
Busy professional example: Marcus added a “Meeting‑Outcome” box after noticing he never recorded decisions. By the end of the month, his follow‑up emails dropped by half because the key points were already captured.
Actionable checklist for your first iteration
- Print or duplicate the template in your preferred digital tool.
- Use it for the recommended trial period (see examples above).
- At the end of the period, fill out the Review section with honest answers.
- Identify one column to adjust—add a sub‑section, change a time increment, or swap a colour.
- Implement the change, then repeat the cycle.
Remember, iteration is never about perfection; it’s about progress. Even shaving five minutes off a Pomodoro block can free up an extra task slot each day.
Free printable resources to jump‑start your iteration
If you need fresh layouts to test, Day Designer offers a library of free printables that include daily, weekly, and habit‑tracker pages. You can download a new grid, print it, and immediately start a new iteration cycle.
Finally, treat your planner like a conversation with yourself. Each print‑out, each digital tweak, each reflection is you saying, “I see you, I hear you, and I’m willing to adjust.” That mindset is what makes a productivity planner template truly work for students, remote workers, freelancers, and busy professionals alike.
FAQ
What exactly is a productivity planner template?
A productivity planner template is a pre‑designed layout that gives you dedicated spots for daily goals, time‑blocked Pomodoro sessions, habit trackers, and quick reflections. Think of it as a skeleton you fill in each day so you don’t have to reinvent the wheel every morning. By having sections already mapped out, you spend less brain‑power deciding where to write and more on actually doing the work.
How do I choose the right layout for my workflow?
Start by matching the grid to how you naturally segment your day. If you thrive on hour‑by‑hour focus, an hourly spread works best; if you prefer a bird’s‑eye view, go for a weekly double‑page. Look at the tasks you juggle—students often need a “Class Schedule” column, freelancers love a “Client Invoice” box, and remote workers benefit from a “Timezone Overlap” slot. Sketch a couple of options, try one for a full day, then tweak the sections that feel cramped or empty.
Can I use a digital version of the template with Focus Keeper?
Absolutely. The same columns you print on paper can be recreated in a note‑taking app or a simple spreadsheet. Keep the structure identical—habit tracker on the left, Pomodoro blocks in the centre, and a reflection note on the right—so you can flip between screen and paper without relearning the layout. When you pair it with the Focus Keeper timer, the timer’s 25‑minute intervals slot neatly into the time‑blocking column, turning intention into action.
How often should I review and adjust my template?
Set a weekly “review Friday” ritual lasting five minutes. Scan each column: Did any section stay empty? Did a Pomodoro block feel too long or too short? Jot down one tiny tweak—maybe shrink a 30‑minute slot to 25 minutes, or add a quick “Energy Level” rating. Implement that change the following week and repeat. Small, regular adjustments keep the planner feeling fresh and prevent it from becoming a static piece of paper.
What if I forget to fill in the habit tracker each day?
Treat the habit tracker like a tiny checklist you complete right after your last Pomodoro. Place a sticky note on the planner’s front cover that says “Mark habits before you close.” The act of ticking a box creates a visual cue that reinforces the behavior, and over a week you’ll see a streak form—a subtle dopamine hit that makes you want to keep the streak alive.
Is a printable template better than a fully digital system?
Neither is universally superior; it depends on distraction tolerance and tactile preference. Printables let you colour‑code with markers, add stickers, and keep screens off—great for students who get sidetracked by notifications. Digital versions shine when you need instant rearranging, cloud syncing across devices, or quick sharing with a remote team. Many users start with a paper draft, then duplicate the same grid in a digital tool once they’ve nailed the layout.
Conclusion
We’ve walked through everything you need to build a productivity planner template that actually moves you forward, whether you’re a student cramming for finals or a freelancer juggling multiple clients.
So, what does success look like? It’s that moment when you flip to the next page, see a clean habit‑tracker column, and know exactly which Pomodoro block you’ll fill next—no hesitation, no scrolling through endless apps.
In our experience, the simplest tweaks—shrinking a 30‑minute slot to 25 minutes, adding a one‑line energy rating, or sticking a reminder on the cover—make the planner feel alive rather than static.
Remember to treat your planner like a conversation with yourself. A quick Friday review, a tiny habit‑check, and a tiny adjustment keep the system breathing.
Does it feel overwhelming to keep iterating? Not at all. Pick one section, test it for a week, note the friction, and make a micro‑change. That’s all the momentum you need.
Ready to put the final piece in place? Grab a fresh sheet, slot your top three priorities, and watch the momentum build. Your next breakthrough is just a page turn away.